Floating Floor vs Glue Down Vinyl Floor – Which is Better?
This site contains affiliate links. As an Amazon Associate, I earn from qualifying purchases. The content on this website was created with the help of AI. Please read our Editorial Policy for more information.
Choosing between a floating floor and glue-down installation can feel overwhelming when you’re standing in the flooring aisle or scrolling through endless options online. You’re not just picking a floor—you’re making an important decision that affects your home’s comfort, your budget, and how long your investment will last.
Here’s the good news: understanding the differences between these two popular installation methods doesn’t require a degree in construction. Whether you’re planning a DIY weekend project or hiring professionals, this guide breaks down everything you need to know about floating floor versus glue-down installation, from cost and durability to which rooms work best for each method. By the end, you’ll have the confidence to make an informed decision that fits your home’s needs and your lifestyle.
What is a Floating Floor?
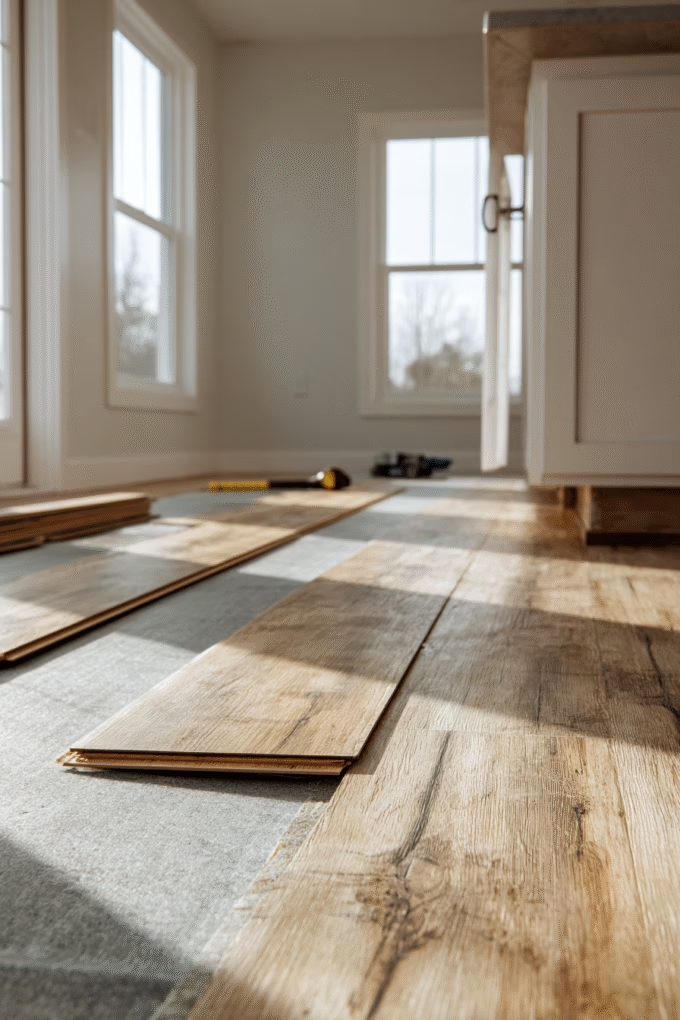
A floating floor is exactly what it sounds like—flooring that “floats” above your existing subfloor without being permanently attached. Instead of nails or adhesives, floating floors use a click-lock system where individual planks snap together through precision-engineered tongue-and-groove connections.
This installation method has gained immense popularity over the past decade, particularly with luxury vinyl flooring and engineered wood products. According to Grand View Research, the global luxury vinyl tiles (LVT) segment led the flooring market with a 64.7% revenue share in 2024, with much of that growth driven by click-lock floating installations.
The floating installation method works by connecting planks at their edges without any attachment to the floor below. Many floating floors include a thin underlayment (foam or cork padding) that sits between the planks and the subfloor, providing cushioning, sound dampening, and a vapor barrier for moisture protection.
How Floating Floors Work
The click-lock system is the heart of floating floor technology. Each plank features a precisely milled edge—one side with a protruding tongue, the opposite side with a recessed groove. You angle one plank into another at about 20-30 degrees, press down, and hear a satisfying “click” as the locking mechanism engages.
This tongue-and-groove system creates a strong connection between planks while allowing the entire floor to move as a single unit. This natural movement is crucial because all flooring materials expand and contract with temperature and humidity changes. A floating floor accommodates these shifts without buckling or separating because it’s not rigidly fixed in place.
What is Glue-Down Flooring?
Glue-down installation is the traditional method where flooring is permanently adhered to the subfloor using a strong adhesive. This glue-down method creates a stable, immobile floor that becomes essentially part of your home’s structure.
The glue-down installation process involves two main adhesive types: hard-set and pressure-sensitive. Hard-set adhesives work similarly to construction glue—you spread the adhesive across the subfloor with a trowel, then press planks into the wet glue before it dries. This creates an extremely strong bond but offers little forgiveness if you make a mistake.
Pressure-sensitive adhesives stay tacky indefinitely, allowing you to reposition planks within a short window after placement. This type of adhesive is more forgiving for DIY projects but may not provide the same long-term stability as hard-set options in high-traffic areas.
Why the Glue Matters
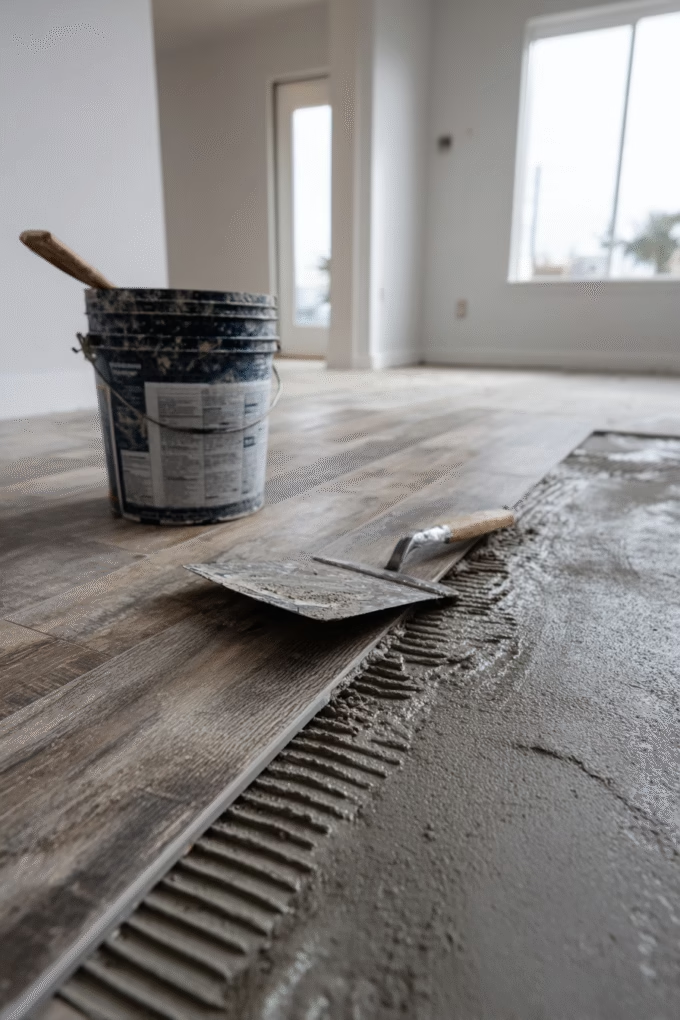
The adhesive in glue-down floors does more than just hold planks in place. A high-quality adhesive acts as its own vapor barrier, protecting your flooring from moisture that naturally rises from concrete subfloors. This moisture protection makes glued-down floors particularly valuable in basements and ground-floor installations over concrete.
The glue also provides superior stability compared to floating installations. Because each plank is individually adhered to the subfloor, there’s virtually no movement, shifting, or the hollow sounds that sometimes plague floating floors.
Floating Floor Pros and Cons
Advantages of Floating Floors
Easy Installation and DIY-Friendly
Floating floors rank as the easiest flooring installation method for homeowners tackling DIY projects. The click-lock system requires no special skills beyond basic measuring and cutting. Most people can install a floating floor in an average bedroom (12′ × 12′) in 4-6 hours, compared to a full day or more for glue-down installation.
This ease of installation translates directly to cost savings. Professional installation for floating floors typically runs $1-3 per square foot, while DIY installation costs only the price of materials plus a modest tool rental if needed.
Quick and Clean Process
Unlike glue-down floors, floating installations create minimal mess. There are no adhesive fumes, no waiting for glue to cure, and no risk of getting sticky residue on your hands, clothes, or baseboards. You can walk on a floating floor immediately after installation—no curing time required.
This makes floating floors the best choice for occupied homes where you need to install new flooring room-by-room without disrupting daily life. You can finish a bedroom in the morning and sleep in it that night.
Forgiving of Subfloor Imperfections
Floating floors can mask minor subfloor irregularities that would require extensive preparation for glue-down installation. The underlayment beneath floating floors provides cushioning that compensates for small dips, bumps, or uneven spots in your existing subfloor.
However, “minor” is the key word here. You still need a relatively level surface—within 3/16″ over a 10-foot span according to most manufacturer specifications. But small imperfections that would cause glued planks to hollow out or not adhere properly won’t necessarily doom a floating floor.
Simple Repairs and Replacement
If damage occurs to a floating floor, repairs are straightforward. You can typically remove and replace damaged planks without disturbing the entire floor. Individual planks can be unclicked and swapped out, making it easy to keep spare planks on hand for future repairs.
This repair-friendly nature makes floating floors particularly practical for renters or homeowners who anticipate moving within 5-10 years. When it’s time to relocate, some floating floors can even be uninstalled and reinstalled in a new home—something impossible with glued-down floors.
Ideal for Apartments and Rentals
Many apartment buildings and rental properties specifically require floating floors because they don’t alter the underlying structure. Landlords appreciate that floating floors can be removed without damaging the original subfloor, and many lease agreements prohibit permanent installations like glue-down flooring.
Disadvantages of Floating Floors
Hollow Sounds and Acoustics
The most common complaint about floating floors is the hollow sound they produce when you walk across them. Because there’s a tiny air gap between the flooring and subfloor, footsteps can create a slightly echoing, drum-like quality that some people find annoying.
This acoustic issue becomes more pronounced in spaces with poor underlayment or uneven subfloors. A high-quality underlayment with sound-dampening properties can minimize—though rarely eliminate—this hollow sound. Expect to pay $0.50-1.50 per square foot for premium acoustic underlayments.
Less Stable in High-Traffic Areas
Floating floors can shift slightly under heavy foot traffic or rolling loads. While properly installed floating floors shouldn’t move noticeably during normal use, they’re generally less stable than glued-down options in commercial spaces or areas with heavy furniture.
The planks can separate at the seams over time, especially in spaces with significant temperature fluctuations or humidity changes. These separations typically measure only 1-2mm but can be visible and may worsen with age.
Movement and Shifting Concerns
Because the entire floor moves as one connected unit, floating floors require expansion gaps around the room’s perimeter—usually 1/4″ to 1/2″. These gaps are covered by baseboards or quarter-round molding, but they’re non-negotiable.
Heavy furniture or appliances can cause localized denting or compression in floating floors, particularly those with softer cores. Refrigerators, washing machines, and other heavy items may leave permanent indentations if the floor beneath them shifts.
Limited Water Resistance
While many floating vinyl floors are marketed as “waterproof,” the click-lock seams remain vulnerable to water infiltration. If water seeps between planks and gets trapped in the underlayment, it can lead to mold, warping, or subfloor damage that’s not immediately visible.
This vulnerability makes floating floors less ideal for moisture-prone areas like laundry rooms, full bathrooms, or basements with known moisture issues, despite manufacturer claims otherwise.
Glue-Down Floor Pros and Cons
Advantages of Glue-Down Installation
Superior Stability and Durability
Glue-down floors offer unmatched stability because each plank is individually bonded to the subfloor. There’s no movement, no shifting, and no separation at the seams even under heavy rolling loads or commercial-grade foot traffic.
This superior stability makes glue-down installation the best choice for commercial spaces, retail environments, healthcare facilities, and other high-traffic areas where floor performance is critical. Commercial applications led the vinyl flooring market with a 54.3% revenue share in 2024, with the majority using glue-down installation.
Quiet, Solid Feel Underfoot
Unlike floating floors, glued-down floors produce no hollow sounds. Walking across a properly installed glue-down floor feels similar to walking on natural hardwood floors—solid, quiet, and premium.
This acoustic advantage makes glue-down floors the right choice for home offices, bedrooms, nurseries, recording studios, or any space where noise is a concern. The adhesive layer itself acts as a sound dampener, absorbing vibrations rather than amplifying them.
Long-Term Stability
Glue-down floors don’t develop the gaps or separations common in aging floating floors. The strong adhesive holds planks in place permanently, preventing the thermal expansion and contraction that can create visible seams over time.
This long-term stability translates to a longer lifespan. While a floating floor might show wear at seams after 10-15 years, a properly installed glue-down floor can remain seamless for 20-25 years or more.
Better Moisture Resistance
The adhesive in glue-down installations acts as a vapor barrier, protecting flooring from moisture rising through concrete subfloors. This makes glued-down floors superior for basements, ground-floor installations, and areas with high humidity.
For homeowners dealing with concrete subfloors—which naturally release moisture vapor—glue-down installation provides essential protection that floating floors can’t match. Many flooring warranties specifically require glue-down installation over concrete to remain valid.
Thinner Profile
Glue-down floors typically measure 2-3mm thick, compared to 5-8mm for floating floors (including underlayment). This thinner profile is crucial for maintaining proper door clearances, especially when installing new flooring over existing surfaces.
The low profile also works well for transitions between rooms with different flooring types. You can often match heights more easily with glue-down installation, creating smoother transitions and reducing trip hazards.
Excellent for Complex Patterns
Interior designers prefer glue-down installation for intricate floor designs, borders, medallions, or herringbone patterns. Because each plank is individually placed and permanently set, you can create custom designs impossible with click-lock floating systems.
This design flexibility matters if you’re aiming for a high-end, custom look rather than standard plank installation.
Disadvantages of Glue-Down Installation
Professional Installation Required
The glue-down method requires skill, precision, and experience. DIY installation is possible but challenging—mistakes are difficult to correct once adhesive sets, and improper installation can lead to poor adhesion, visible seams, or premature failure.
Most homeowners hire professional installation for glue-down floors, increasing the total project cost significantly. Professional labor typically adds $3-6 per square foot to material costs.
Extensive Subfloor Preparation
Glue-down installation demands a perfectly clean, level, and dry subfloor. Any debris, dust, or contaminants will prevent proper adhesion. The subfloor must be level within 1/8″ over a 10-foot span—a stricter standard than floating floors require.
Concrete subfloors often need grinding, patching, or self-leveling compound before glue-down installation. Wooden subfloors may require sanding and sealing. This preparation adds time and cost to the installation process.
Difficult and Costly Repairs
Repairing damaged planks in a glued-down floor is challenging and expensive. You must cut out the damaged section without harming surrounding planks, scrape away old adhesive, prepare the surface, and install a replacement plank with fresh adhesive.
These repairs rarely look seamless and often require professional assistance. Some homeowners simply live with minor damage rather than face the complexity and cost of proper repairs.
Permanent Installation
Once glue-down flooring is installed, it’s there for the long haul. Removal requires scraping, grinding, or chemical adhesive removers that damage the subfloor. This makes glue-down installation impractical for renters or anyone who might want to change flooring styles in the near future.
The permanence also complicates future renovations. If you want to return to original hardwood floors or switch to a different flooring type, removal costs can exceed $2-4 per square foot.
Longer Installation Time and Curing
Glue-down installation takes significantly longer than floating floors. An experienced installer might complete 300-400 square feet per day, compared to 600-800 square feet for floating floors.
Additionally, most adhesives require 24-48 hours of cure time before you can place furniture or walk heavily on the floor. This means rooms remain unusable for days during installation—a major inconvenience in occupied homes.
Adhesive Fumes and Mess
Even low-VOC adhesives produce odors during installation and curing. Messy glues can get on tools, clothes, and baseboards if you’re not careful. Some people find the smell irritating or headache-inducing during the installation process.
Cost Comparison: Floating vs Glue-Down
Understanding the complete cost picture helps you make an informed decision beyond just material prices.
Material Costs
Floating Floor Materials:
- Budget vinyl plank (20-30 mil wear layer): $1.50-3 per square foot
- Mid-range vinyl plank (30-40 mil wear layer): $3-5 per square foot
- Premium vinyl or engineered wood: $5-8 per square foot
- Underlayment: $0.25-1.50 per square foot
Glue-Down Materials:
- Budget vinyl tile/plank: $1-2.50 per square foot
- Mid-range luxury vinyl plank: $2.50-4 per square foot
- Premium luxury vinyl tile: $4-7 per square foot
- Adhesive: $0.50-1.25 per square foot
- Subfloor prep materials: $0.50-2 per square foot
Installation Costs
Floating Floor Installation:
- DIY: $0 (your time only)
- Professional: $1-3 per square foot
- Total time: 1-2 days for average room
Glue-Down Installation:
- DIY: $0 (requires significant skill)
- Professional: $3-6 per square foot
- Subfloor preparation: $1-4 per square foot additional
- Total time: 2-4 days for average room
Long-Term Costs
When calculating true costs, consider the complete ownership picture over 15-20 years:
Floating Floors:
- Easier, cheaper repairs: $50-200 per damaged plank
- Possible replacement of entire floor if seams fail: $3-6 per square foot
- Lower resale value impact: Neutral to slightly negative in luxury markets
Glue-Down Floors:
- Difficult, expensive repairs: $200-500 per damaged section
- Longer lifespan means lower replacement frequency
- Higher resale value: Premium buyers prefer permanent installations
Budget-Friendly Installation Tips
For floating floors, buying a DIY installation kit (tapping block, pull bar, spacers) costs about $25-40 and makes the job significantly easier. Most home improvement stores rent jamb saws and miter saws for $25-50 per day.
For glue-down installation, budget for professional labor—attempting DIY to save money often backfires with improper installation that costs more to fix than hiring pros initially.
Room-by-Room Recommendations
Different rooms have different demands. Here’s what works best where.
Living Rooms and Family Rooms
Best Choice: Either method works well, but floating floors edge ahead for most homeowners.
Living rooms typically don’t face extreme moisture or commercial-grade traffic. The ease of floating floor installation and lower cost make it the popular choice for residential living spaces. However, if you’re designing a high-end home where acoustics and premium feel matter, glue-down installation provides a more solid, luxurious experience.
The 14-18 inch space between sofas and coffee tables doesn’t create issues for either installation method, though glue-down floors handle heavy sectional furniture better without risk of compression marks.
Kitchens
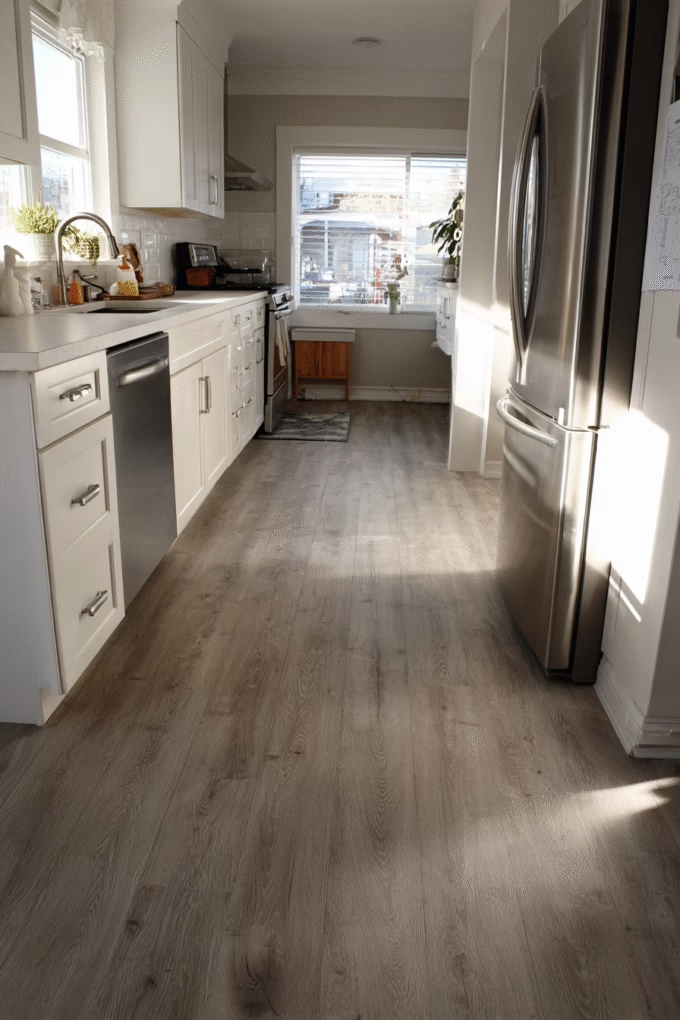
Best Choice: Glue-down (especially over concrete), though waterproof floating LVP is gaining popularity.
Kitchens present moderate to high foot traffic, potential for water spills near sinks and dishwashers, and heavy appliances that remain stationary for years. These conditions favor glue-down installation’s superior stability and moisture protection.
However, modern waterproof vinyl plank products with tight seam construction perform well as floating floors in kitchens. If you choose floating, use high-quality waterproof LVP (not laminate) and ensure proper sealing at all perimeter edges.
Bathrooms and Laundry Rooms
Best Choice: Glue-down installation (non-negotiable for full bathrooms).
These moisture-prone areas absolutely demand the superior water protection of glue-down installation. The adhesive creates a moisture barrier that floating floors simply can’t match, even when marketed as “waterproof.”
Toilets, washing machines, and shower/tub areas create persistent humidity and occasional standing water. The seams in floating floors allow water infiltration that leads to mold, subfloor damage, and warranty voiding.
For powder rooms (half-baths) with sinks only, waterproof floating LVP can work if you’re committed to quickly wiping up any water and ensuring proper ventilation.
Bedrooms
Best Choice: Floating floors (unless acoustics are paramount).
Bedrooms are perfect for floating floor installation. They experience light foot traffic, minimal moisture exposure, and no heavy rolling loads. The ease and affordability of floating installation makes it ideal for bedroom updates.
The one consideration: if you’re bothered by floor noise, glue-down installation provides a quieter sleeping environment. Home offices in bedrooms also benefit from glue-down’s solid, professional feel and quiet acoustics.
Basements
Best Choice: Glue-down over concrete subfloors.
Basement installations nearly always involve concrete subfloors with natural moisture vapor transmission. This makes the vapor barrier properties of glue-down adhesive essential for long-term success.
Basements typically experience temperature swings and higher humidity than upper floors, creating challenging conditions for floating floors. The expansion and contraction can cause gaps, buckling, or adhesive failure in the click-lock system.
If budget constraints force consideration of floating floors in basements, you must install a high-quality vapor barrier beneath the underlayment and use products specifically rated for below-grade installation.
High-Traffic Hallways and Entryways
Best Choice: Glue-down installation.
Hallways and entryways receive concentrated foot traffic that accelerates wear on floating floor seams. The superior stability of glue-down installation prevents the gradual separation and edge wear common in high-use areas.
Heavy foot traffic causes micro-movements in floating floors that compound over time, creating visible seams and potential failure points. Glue-down installation eliminates this movement entirely.
Commercial Spaces
Best Choice: Glue-down installation (required for most commercial warranties).
Commercial applications demand glue-down installation to meet heavy foot traffic requirements and warranty specifications. Commercial applications accounted for 54.3% of the vinyl flooring market in 2024, with the vast majority using glue-down methods.
Retail stores, restaurants, offices, and healthcare facilities all benefit from the permanent stability, noise reduction, and durability that only glue-down installation provides.
Subfloor Requirements and Preparation
Your existing subfloor significantly impacts which installation method will work best and how much preparation you’ll need.
Concrete Subfloors
Concrete presents specific challenges and requirements for both installation methods.
For Floating Floors over Concrete:
- Must be level within 3/16″ over 10 feet
- Requires moisture testing (calcium chloride test recommended)
- Needs vapor barrier underlayment (6-mil polyethylene minimum)
- Moisture content must be below manufacturer specs (typically under 12 lbs/1,000 sq ft per 24 hours)
For Glue-Down over Concrete:
- Must be level within 1/8″ over 10 feet (stricter tolerance)
- Concrete must be fully cured (at least 60 days for new pours)
- Surface must be clean, dust-free, and free of paint or sealers
- pH must be between 7-10 for proper adhesive bonding
- Moisture testing essential—use high-quality adhesive rated for expected moisture levels
Many concrete subfloors require grinding or shot-blasting to remove existing coatings and create a proper bonding surface for glue-down installation. This preparation typically costs $1-3 per square foot but ensures proper adhesion.
Wood Subfloors
Plywood, OSB, and solid wood subfloors work well with either installation method but still require preparation.
For Floating Floors over Wood:
- Must be structurally sound (no soft spots or damage)
- Level within 3/16″ over 10 feet
- All fasteners (nails, screws) must be flush or countersunk
- Subfloor should be clean and dry
For Glue-Down over Wood:
- Must be level within 1/8″ over 10 feet
- Requires light sanding to remove surface treatments
- May need sealing to prevent off-gassing that affects adhesive bonding
- All fasteners must be set below surface
- Gaps between sheets should be filled with floor patch
Existing Flooring
Can you install over existing floors? Sometimes, with caveats.
Floating Floors:
Can often install over existing vinyl, linoleum, or tile if the surface is smooth, level, and well-bonded. Remove existing flooring if it’s loose, damaged, or creates an uneven surface. Never install over carpet.
Glue-Down:
Generally requires removal of existing flooring to ensure proper adhesive bonding with the actual subfloor. Installing glue-down flooring over existing surfaces risks poor adhesion and premature failure.
Regional and Climate Considerations
Where you live affects how your floors perform over time.
Humid Climates
High humidity regions (coastal areas, Southern states, Pacific Northwest) create specific challenges for floating floors. Moisture causes expansion in floor materials, and floating floors can buckle or develop gaps as they expand and contract with seasonal humidity changes.
Glue-down installation performs better in humid climates because the adhesive restricts movement and provides moisture protection. If choosing floating floors in humid areas, select products with superior dimensional stability (look for WPC or SPC rigid core construction) and maintain consistent indoor humidity with dehumidifiers.
Dry or Desert Climates
Low humidity causes materials to contract, potentially creating gaps in floating floors. The constant expansion and contraction cycle in areas with extreme temperature swings (hot days, cool nights) accelerates wear on click-lock systems.
Both installation methods work in dry climates, but floating floors require more careful acclimation before installation. Let materials sit in the installation environment for 48-72 hours to adjust to local conditions.
Temperature Extremes
Spaces with significant temperature fluctuations—sunrooms, enclosed porches, rooms with large south-facing windows—pose challenges for floating floors. The expansion and contraction can exceed the capacity of expansion gaps, causing buckling or separation.
Glue-down installation handles temperature extremes better because the adhesive restricts movement. If installing floating floors in temperature-variable spaces, increase expansion gaps to 3/4″ around the perimeter.
DIY vs Professional Installation
Deciding whether to tackle installation yourself or hire professionals depends on your skills, tools, and project complexity.
When DIY Makes Sense
Floating Floors:
Most homeowners with basic DIY skills can successfully install floating floors. If you can use a measuring tape, circular saw, and follow instructions, you can install floating floors.
Best DIY scenarios:
- Small to medium rooms (under 300 sq ft)
- Simple rectangular layouts
- Level subfloors requiring minimal prep
- No complex transitions or custom cuts
- You have 1-2 full days available
When to Hire Professionals
Glue-Down Installation:
Unless you have previous flooring experience, hire professionals for glue-down installation. The learning curve is steep, mistakes are costly to correct, and improper installation voids warranties.
Definitely hire professionals for:
- Glue-down installation (any size project)
- Large spaces over 500 sq ft
- Complex layouts with multiple angles, transitions, or obstacles
- Subfloors requiring significant leveling or repair
- Moisture-prone areas where installation errors have serious consequences
- Commercial installations
Professional Installation Costs
Get at least three quotes from licensed, insured installers. Expect to pay:
Floating Floors:
- Basic installation: $1-2 per square foot
- With baseboard/trim removal and reinstall: $2-3 per square foot
- Complex layouts: $3-4 per square foot
Glue-Down:
- Basic installation: $3-5 per square foot
- With subfloor prep: $4-6 per square foot
- Complex patterns or custom work: $6-8+ per square foot
Always verify that installers carry liability insurance and worker’s comp coverage. Check references and ask to see photos of completed projects similar to yours.
Flooring Material Options for Each Installation Method
Different flooring materials work better with specific installation methods.
Luxury Vinyl Plank (LVP)
The most versatile flooring material, available for both installation types.
Floating LVP:
- Thickness: 5-8mm (including attached underlayment)
- Click-lock or loose-lay systems
- Best for: Residential applications, DIY installation, budget-conscious projects
- Lifespan: 10-15 years in normal residential use
Glue-Down LVP:
- Thickness: 2-3mm
- Requires quality adhesive selection
- Best for: Commercial spaces, basements, moisture-prone areas
- Lifespan: 15-25 years with proper installation
The luxury vinyl tiles segment led the market with a 64.7% revenue share in 2024, demonstrating LVP’s dominant position in modern flooring.
Engineered Hardwood
Real wood veneer over plywood core, available in both formats.
Floating Engineered Wood:
- Thickness: 3/8″ to 5/8″
- Click-lock system with wood glue sometimes applied to tongues for extra security
- Best for: Upper floors, living areas, traditional aesthetics
- Lifespan: 20-30 years; can be refinished 1-2 times depending on veneer thickness
Glue-Down Engineered Wood:
- Similar thickness range
- Professional installation essential
- Best for: Ground floors over concrete, high-end installations
- Lifespan: 30-40 years with proper care and maintenance
Laminate Flooring
Affordable wood-look flooring, primarily installed as floating floors.
Floating Laminate:
- Thickness: 7-12mm
- Always uses click-lock installation
- Not suitable for glue-down (will swell if adhesive touches core)
- Best for: Budget-conscious projects, DIY installation, low to moderate traffic
- Lifespan: 10-20 years; cannot be refinished
Vinyl Tiles (LVT)
Square tiles rather than planks, excellent for custom patterns.
Glue-Down LVT:
- Standard thickness: 2-3mm
- Ideal for creating custom patterns, borders, or medallions
- Professional installation recommended for pattern work
- Best for: Commercial applications, design-focused residential projects
- Lifespan: 15-20 years
Floating LVT:
- Less common than glue-down
- Limited pattern options due to click-lock constraints
- Works for simple installations only
Warranty Considerations
Flooring warranties vary significantly between installation methods, and understanding these differences protects your investment.
Manufacturer Warranties
Most luxury vinyl flooring carries two types of warranties: wear warranties and structural warranties.
Floating Floor Warranties:
- Typically rated for residential use only or “light commercial”
- Wear warranties: 10-25 years (often prorated)
- Structural warranties: 5-10 years
- Warranties often void if installed in full bathrooms, commercial spaces, or over improper subfloors
Glue-Down Warranties:
- Often rated for commercial use with heavier traffic ratings
- Wear warranties: 15-30 years (sometimes lifetime for residential)
- Structural warranties: 10-20 years
- More comprehensive coverage for moisture-related issues when proper adhesive is used
Installation Warranties
Professional Installation:
Reputable installers offer installation warranties separate from manufacturer warranties, typically covering workmanship for 1-5 years. This covers issues like poor seams, adhesive failure, or installation-related defects.
DIY Installation:
You assume all installation warranty responsibilities. If installation errors cause problems, manufacturers may deny material warranty claims, arguing that improper installation—not product defects—caused the failure.
What Voids Warranties
Common warranty-voiding mistakes:
- Installing floating floors in spaces requiring glue-down (per manufacturer specs)
- Using wrong adhesive types for glue-down installation
- Failing to acclimate materials before installation
- Installing over unapproved subfloors
- Exceeding maximum room dimensions without transitions
- Installing in areas with improper climate control
Always read warranty terms carefully before purchase and keep all documentation, receipts, and proof of professional installation if applicable.
Maintenance and Long-Term Care
Proper maintenance differs slightly between installation methods.
Floating Floor Maintenance
Daily Care:
- Sweep or vacuum with soft brush attachment (avoid beater bars)
- Wipe spills immediately—water can infiltrate seams over time
- Use microfiber mops for damp cleaning
Monthly Care:
- Damp mop with pH-neutral vinyl floor cleaner
- Check seams for separation and address immediately
- Inspect for plank movement or loosening
Avoiding Damage:
- Use furniture pads under all furniture legs (even light pieces can cause compression)
- Place rugs or runners in high-traffic areas to reduce wear on seams
- Maintain consistent indoor temperature and humidity (68-72°F, 30-50% humidity)
- Avoid steam mops (moisture and heat can damage click-lock connections)
Glue-Down Floor Maintenance
Daily Care:
- Sweep or vacuum regularly
- Clean spills promptly though glued floors tolerate moisture better than floating
Monthly Care:
- Damp or wet mop with appropriate vinyl cleaner
- Deep clean with approved vinyl floor cleaning products
- Check perimeter edges for adhesive separation (rare but possible)
Long-Term Protection:
- Furniture pads recommended but less critical than with floating floors
- Professional deep cleaning every 1-2 years maintains appearance
- Regular sweeping prevents abrasive dirt from wearing the surface
Both installation types benefit from:
- Entryway mats to trap dirt and moisture
- Window treatments to prevent UV fading
- Climate control to minimize expansion and contraction
Making Your Final Decision
After comparing all factors, use this decision framework to choose the right installation method for your project.
Choose Floating Floors If:
- You’re installing in bedrooms, living rooms, or other light-to-moderate traffic residential spaces
- Budget is a primary concern and you want to minimize installation costs
- You prefer DIY installation or need a quick project completion
- You’re a renter or may relocate within 5-10 years
- Your subfloor has minor imperfections you’d rather not address
- The space doesn’t face significant moisture exposure
- Noise isn’t a major concern in that room
- You value easy future repairs or replacement
Choose Glue-Down Installation If:
- You’re installing in kitchens, bathrooms, laundry rooms, or basements
- The space is commercial or experiences heavy foot traffic
- You’re installing over concrete subfloors, especially on or below grade
- Noise reduction and premium feel are priorities
- You want maximum long-term stability and durability
- You’re creating custom patterns, borders, or designs
- Your home is in a high-humidity or temperature-extreme climate
- This is a permanent installation in a home you plan to keep long-term
Questions to Ask Before Deciding:
- What’s my budget? Include materials, installation, and prep work costs.
- Who’s installing this? DIY capability limits you primarily to floating floors.
- What’s my timeline? Floating floors finish faster; glue-down requires more time.
- What’s my subfloor condition? Poor subfloors may require extensive prep for glue-down.
- How long will I live here? Shorter timeline favors floating floors.
- What’s the room’s purpose? High-moisture or high-traffic spaces need glue-down.
- Do I care about acoustics? Quiet spaces benefit from glue-down’s solid feel.
- What does my warranty require? Some manufacturers specify installation methods for certain spaces.
Frequently Asked Questions
Is floating floor better than glue-down?
Neither method is universally “better”—the right choice depends on your specific situation. Floating floors excel in ease of installation, affordability, and DIY-friendliness for residential spaces with light to moderate traffic. Glue-down installation provides superior stability, noise reduction, and moisture protection for commercial spaces, high-traffic areas, and moisture-prone rooms. Consider your room’s purpose, subfloor type, budget, and long-term plans when deciding.
Can you install luxury vinyl plank over existing flooring?
Floating LVP can often install over existing vinyl, linoleum, or well-adhered tile if the surface is smooth, level, and stable. The existing flooring must be firmly attached without loose areas or significant damage. However, glue-down LVP typically requires installing directly on the original subfloor to ensure proper adhesive bonding. Remove any existing flooring that’s loose, damaged, or creates an uneven surface before installation.
Does glue-down flooring last longer than floating floors?
Yes, properly installed glue-down flooring typically lasts 15-25 years compared to 10-15 years for floating floors in residential applications. The permanent bond prevents seam separation, movement, and edge wear that can plague floating floors over time. However, the lifespan of either method depends heavily on product quality, proper installation, and maintenance practices.
What’s the biggest downside of floating floors?
The hollow sound is the most common complaint about floating floors. Because the flooring isn’t attached to the subfloor, footsteps can create an echoing, drum-like quality. This acoustic issue ranges from barely noticeable to annoying depending on the underlayment quality, subfloor condition, and installation precision. High-quality underlayment with sound-dampening properties can minimize but rarely eliminate this characteristic.
Can I install glue-down flooring myself?
While technically possible for experienced DIYers, glue-down installation is challenging and mistakes are costly to correct. You need skill in applying adhesive evenly, working quickly before it sets, ensuring proper plank alignment, and thoroughly preparing subfloors. Most homeowners hire professionals for glue-down installation to ensure proper adhesion, maintain warranty coverage, and avoid expensive mistakes. If attempting DIY glue-down, start with a small, low-visibility area to develop skills.
Which installation method is best for basements?
Glue-down installation is strongly recommended for basements, particularly over concrete subfloors. The adhesive acts as a vapor barrier, protecting flooring from moisture that naturally rises through concrete. Basements face higher humidity, temperature swings, and moisture exposure than upper floors—conditions that can cause floating floors to buckle, gap, or develop mold. If budget forces consideration of floating floors in basements, you must install a high-quality vapor barrier and choose products specifically rated for below-grade installation.
Does floating floor feel different from glue-down?
Yes, floating floors have a slightly softer, more cushioned feel underfoot due to the underlayment layer between the flooring and subfloor. They may also flex slightly when walking, though this shouldn’t be pronounced with proper installation. Glue-down floors feel more solid and stable, similar to traditional hardwood floors permanently fastened to the subfloor. The difference is noticeable but not necessarily negative—some people prefer the cushioned comfort of floating floors, while others want the solid feel of glue-down.
How much does it cost to remove glue-down flooring?
Removing glued-down flooring is labor-intensive and typically costs $2-4 per square foot professionally. The process involves cutting and prying up adhered planks, then scraping or grinding away residual adhesive. This often damages the subfloor, requiring additional repairs before installing new flooring. Chemical adhesive removers can help but add cost and require proper ventilation. This removal difficulty makes glue-down installation a truly permanent choice.
Conclusion
The choice between floating floor and glue-down installation comes down to balancing your priorities: budget versus longevity, DIY convenience versus professional stability, and temporary flexibility versus permanent quality.
Floating floors deliver unmatched ease and affordability for homeowners tackling bedroom, living room, or office updates. The click-lock system makes DIY installation accessible even for beginners, and the lower material costs keep projects budget-friendly. For residential spaces without extreme moisture or commercial traffic, floating floors provide excellent performance and value.
Glue-down installation remains the gold standard for durability, stability, and moisture protection. If you’re installing in kitchens, bathrooms, basements, or commercial spaces—or if you simply want the most solid, premium-feeling floor possible—glue-down installation justifies its higher cost and complexity. The superior longevity and performance in challenging environments make it a smart investment for long-term homeowners.
Remember that proper installation matters more than the method itself. A poorly installed glue-down floor will underperform a well-installed floating floor, and vice versa. Whether you choose DIY or professional installation, following manufacturer guidelines, properly preparing your subfloor, and using quality materials ensures your new flooring looks great and performs well for years to come.
Ready to start your flooring project? Remember these key takeaways:
- Floating floors win for ease, speed, and cost in most residential spaces
- Glue-down installation excels in moisture-prone areas, commercial spaces, and basements
- Your subfloor condition significantly impacts which method will work best
- Professional installation for glue-down is almost always worth the investment
- Both methods can deliver beautiful, durable floors when properly installed
What flooring installation questions do you still have? Share your specific situation in the comments, and let’s help you make the best choice for your home!