20 Best Textured Ceiling Ideas to Use in Homes
This site contains affiliate links. As an Amazon Associate, I earn from qualifying purchases. The content on this website was created with the help of AI. Please read our Editorial Policy for more information.
Staring up at a flat, boring ceiling and wondering if there’s more you could do with that overlooked fifth wall? You’re not alone. Textured ceilings are making a major comeback in 2025, moving beyond the outdated popcorn ceilings of decades past to embrace sophisticated, character-filled designs that add depth and personality to any room.
Whether you’re looking to hide minor imperfections, add visual interest, or simply update your home’s aesthetic, the right textured ceiling can completely transform your space. From subtle orange peel texture that works beautifully in small rooms to dramatic coffered designs perfect for dining areas, there’s a ceiling texture solution for every style and budget.
In this comprehensive guide, I’ll walk you through 18 stunning textured ceiling ideas that interior designers are recommending in 2025. You’ll discover which textures work best for different rooms, get realistic cost estimates, learn DIY difficulty ratings, and find out which options boost resale value.
Whether you’re a confident DIYer or planning to hire a professional, you’ll find the inspiration and practical knowledge you need to elevate your home’s design from the ground up—or rather, from the ceiling down.
1. Knockdown Texture for Modern Rustic Appeal
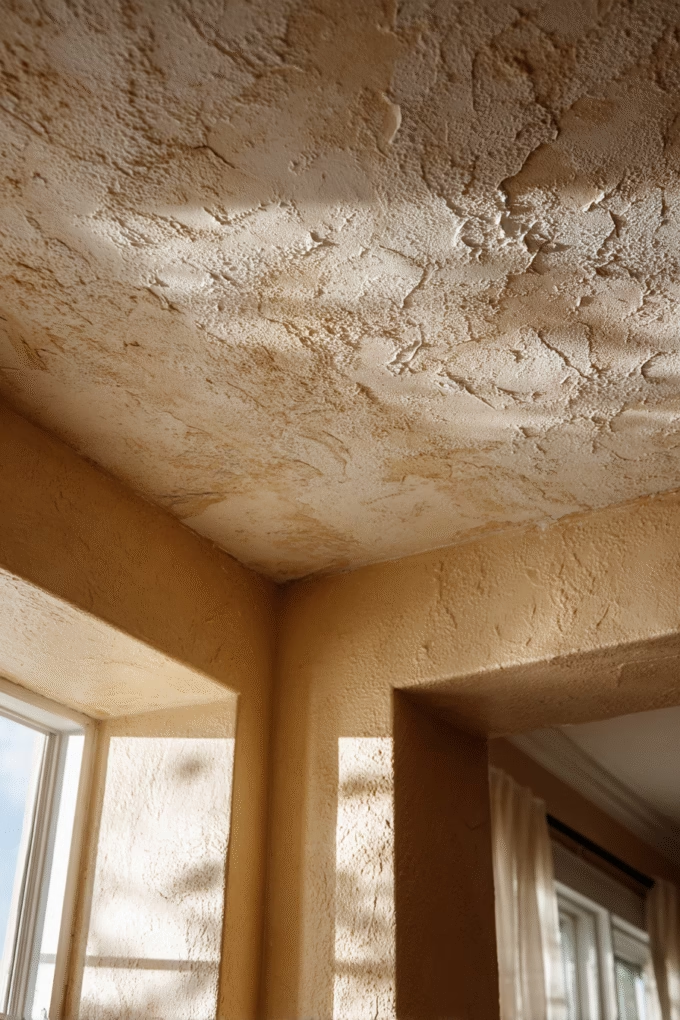
Knockdown texture remains a popular choice in modern homes for good reason. This textured ceiling technique creates a sophisticated, stucco-like appearance that conceals drywall imperfections while adding subtle dimension to your space.
The technique involves spraying joint compound onto the ceiling surface, then “knocking down” the peaks with a trowel before they fully dry. This creates wide, irregular patterns with both raised and flat sections that catch light beautifully throughout the day.
Interior designers recommend knockdown texture particularly for living rooms and hallways where you want visual interest without overwhelming the space. The texture works exceptionally well in homes with 9-foot or higher ceilings, as the pattern creates depth without making the room feel smaller.
One major advantage is cost-effectiveness. Professional installation typically runs $1.50 to $3 per square foot, making it more affordable than smooth ceilings which require extensive sanding and multiple coats. DIY enthusiasts can tackle this project with a rented texture sprayer and some practice, though achieving consistent results takes patience.
The rustic pattern pairs beautifully with contemporary farmhouse, transitional, and Southwestern design styles. For color, stick with warm whites or soft neutrals to let the texture create natural shadows. In spaces with abundant natural light, knockdown texture provides just enough visual interest without competing with furnishings or artwork.
Maintenance is straightforward since the irregular surface doesn’t show dust as easily as flat ceilings. However, repairs can be tricky—matching the existing pattern requires skill, so consider this if you have young children who might damage the ceiling with thrown toys.
2. Orange Peel Texture for Subtle Visual Interest
Orange peel texture is the go-to choice for homeowners who want textured ceilings that add character without making a bold statement. Named for its resemblance to the dimpled surface of an orange, this subtle texture creates a refined look that’s become increasingly popular in new construction.
Created by spraying a thinned drywall compound through a hopper gun at high velocity, orange peel texture produces small, flat-topped bumps across the entire ceiling. The result is more refined than popcorn ceilings but still provides enough texture to hide minor imperfections and reduce glare from overhead lighting.
This textured finish is particularly well-suited for small rooms and small spaces where heavier textures might feel overwhelming. Bedrooms, home offices, and entryways benefit from orange peel’s understated elegance. The texture also works beautifully in modern homes where clean lines are important but perfectly smooth ceilings aren’t in the budget.
Cost-wise, orange peel texture is one of the most budget-friendly options at $1 to $2 per square foot for professional application. It’s also the easiest DIY texture for beginners—spray-on versions are available in aerosol cans at any home improvement store, requiring no specialized equipment.
From a practical standpoint, orange peel texture strikes an ideal balance between aesthetics and maintenance. The textured surface is easier to clean than heavily textured options while still providing enough dimension to hide ceiling imperfections like hairline cracks or slightly uneven drywall seams.
Interior designers particularly appreciate how orange peel complements contemporary and minimalist design styles. Paint colors work beautifully over this texture—consider crisp whites for maximum light reflection, or try soft grays for a sophisticated modern look.
3. Skip Trowel for Mediterranean Elegance
Skip trowel texture, also known as Santa Fe ceiling texture, brings old-world charm and Mediterranean sophistication to modern homes. This hand-applied technique creates an artisanal, plaster-like appearance that interior designers love for its unique character.
The application process involves spreading joint compound with a wide trowel in a “skipping” motion across the ceiling surface. The trowel is held at varying angles and pressure, creating irregular patterns with both textured areas and smooth spots. This intentional imperfection gives skip trowel its distinctive handcrafted appeal.
This textured ceiling works exceptionally well in dining rooms, foyers, and master bedrooms where you want to make a design statement. The texture adds subtle depth without overwhelming the space, making it perfect for rooms with 8-foot ceilings where dramatic textures might feel too heavy.
Skip trowel texture is particularly effective at concealing ceiling imperfections. The irregular pattern naturally camouflages minor cracks, slight unevenness, and drywall seams that might show through on smooth ceilings. This makes it a practical choice for older homes or spaces with less-than-perfect existing conditions.
Professional installation typically costs $2 to $4 per square foot, reflecting the skill and time required for hand application. This isn’t the best option for DIYers unless you have drywall experience—achieving the right balance between textured and smooth areas requires practice and a good eye for aesthetics.
The style pairs beautifully with Spanish Colonial, Tuscan, and Mediterranean design aesthetics. Consider warm neutrals like sandy beige, soft terracotta, or creamy whites to enhance the European-inspired ambiance. In homes with exposed wooden beams, skip trowel provides the perfect complement to create cohesive architectural interest.
4. Smooth Finish for Modern Minimalism
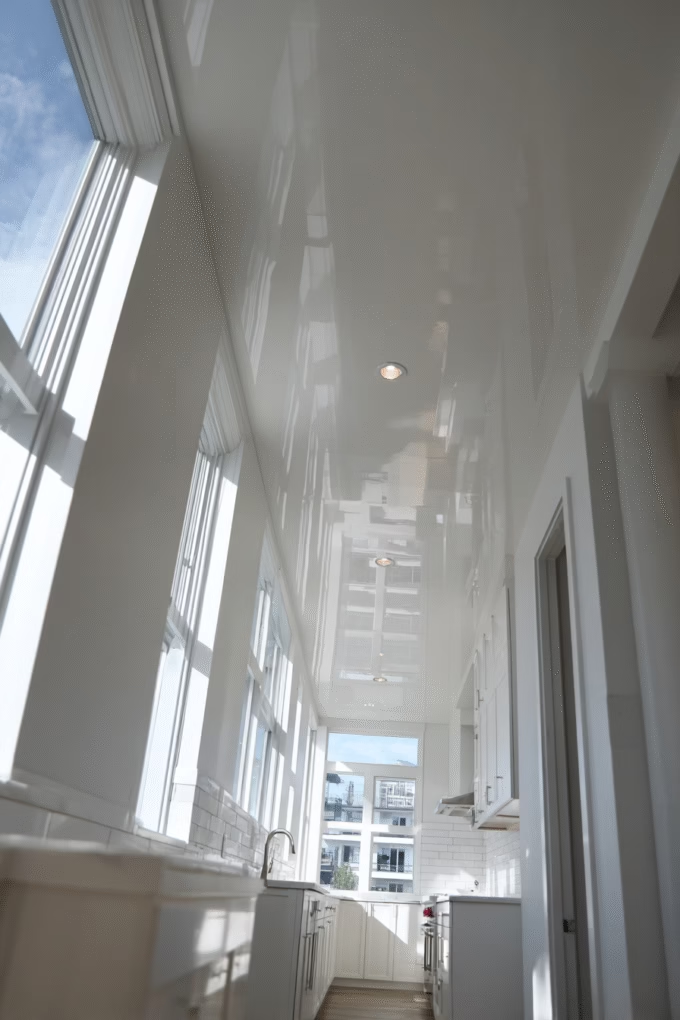
While this article focuses on textured options, smooth ceilings deserve recognition as the top choice for resale value and contemporary aesthetics. A perfectly smooth ceiling provides a clean canvas that makes spaces feel larger, brighter, and more modern—exactly what today’s homebuyers seek.
Achieving a truly flat ceiling requires exceptional skill and patience. Contractors apply multiple thin layers of joint compound, sanding between each coat to eliminate even the smallest imperfections. This labor-intensive process explains why smooth ceilings often cost more than textured alternatives, typically running $2 to $5 per square foot.
Interior designers consistently recommend smooth finishes for kitchens, bathrooms, and open-concept living areas. In these spaces, flat ceilings reflect maximum light, making rooms appear more spacious and allowing architectural elements like pendant lighting or crown molding to take center stage.
The minimalist aesthetic of smooth ceilings complements virtually every design style from Scandinavian to mid-century modern to contemporary farmhouse. Paint colors show their truest hue on smooth surfaces, giving you more flexibility with bold ceiling colors if you want to make a statement.
Maintenance is the major advantage of smooth finishes. Unlike textured surfaces that trap dust and cobwebs, smooth ceilings wipe clean effortlessly. This makes them particularly practical for households with allergies or anyone who prioritizes low-maintenance surfaces.
However, smooth ceilings have one significant drawback: they show every flaw. Minor settling cracks, slight drywall imperfections, and uneven seams become immediately visible. If your home has structural settling or you’re working with older drywall, a subtle texture might prove more forgiving.
According to real estate data, homes with smooth ceilings consistently appraise higher than those with dated textured finishes. If you’re planning to sell within five years, investing in smooth ceilings throughout main living areas can provide strong returns.
5. Stippled Texture for Classic Character
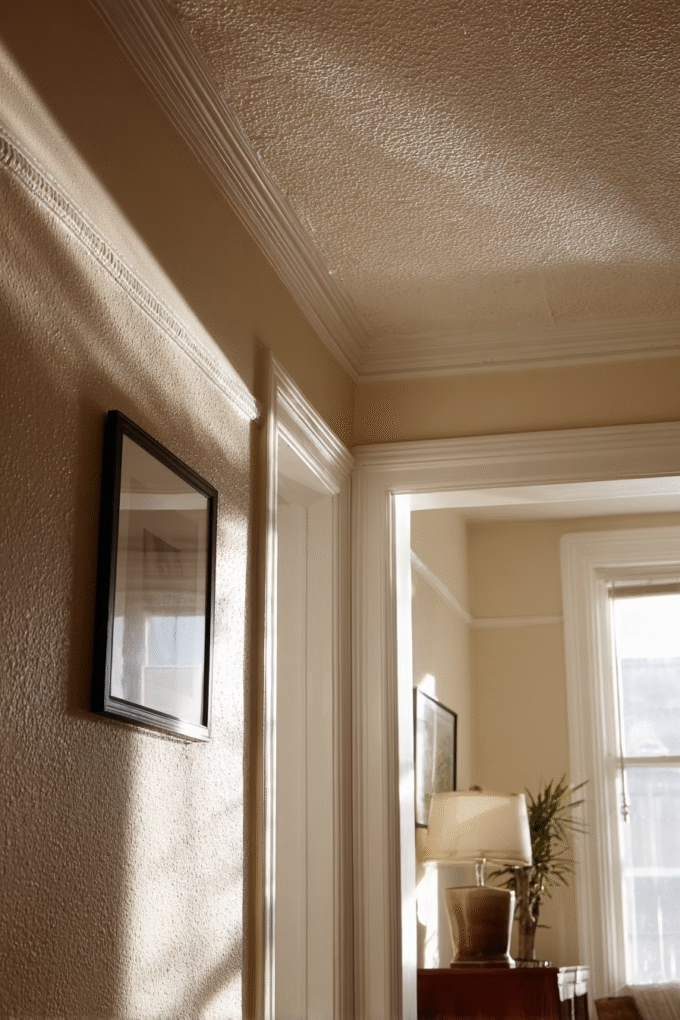
Stippled ceiling texture, sometimes called slap brush or stomp texture, creates a timeless look that works beautifully in traditional and transitional homes. This technique produces a dotty, irregular surface that adds depth and character while effectively hiding ceiling flaws.
Application involves pressing a special brush with coarse bristles into wet joint compound, creating small peaks and ridges across the ceiling surface. The random, hand-stamped appearance gives stippled ceilings their distinctive artisanal quality that machine-sprayed textures can’t replicate.
This textured finish particularly suits family rooms, bedrooms, and hallways in homes built between the 1960s and 1990s. The classic texture feels authentic to these architectural periods while providing practical benefits like acoustic dampening and imperfection concealment.
Interior designers appreciate how stippled texture works in spaces with lower ceiling heights. Unlike heavy textures that can make rooms feel cramped, stipple creates visual interest through subtle shadows without overwhelming small spaces. The pattern also helps direct light in interesting ways, reducing the harsh glare from overhead fixtures.
Professional installation costs approximately $1.50 to $3 per square foot, making it a mid-range option. DIY application is moderately difficult—the technique requires coordination and consistent pressure to achieve uniform results, but homeowners with patience can learn the skill with practice on scrap drywall.
Maintenance requires regular dusting since the raised texture traps airborne particles. A microfiber duster with extension handle makes this task manageable, though stippled ceilings do require more upkeep than smoother alternatives.
The rustic pattern pairs well with warm paint colors like soft beiges, gentle taupes, and creamy off-whites. Avoid bright whites which can emphasize the texture’s irregularity in harsh lighting. In rooms with abundant natural light, stippled texture creates hundreds of tiny shadows that add dimension throughout the day.
6. Swirl Ceiling Texture for Decorative Flair
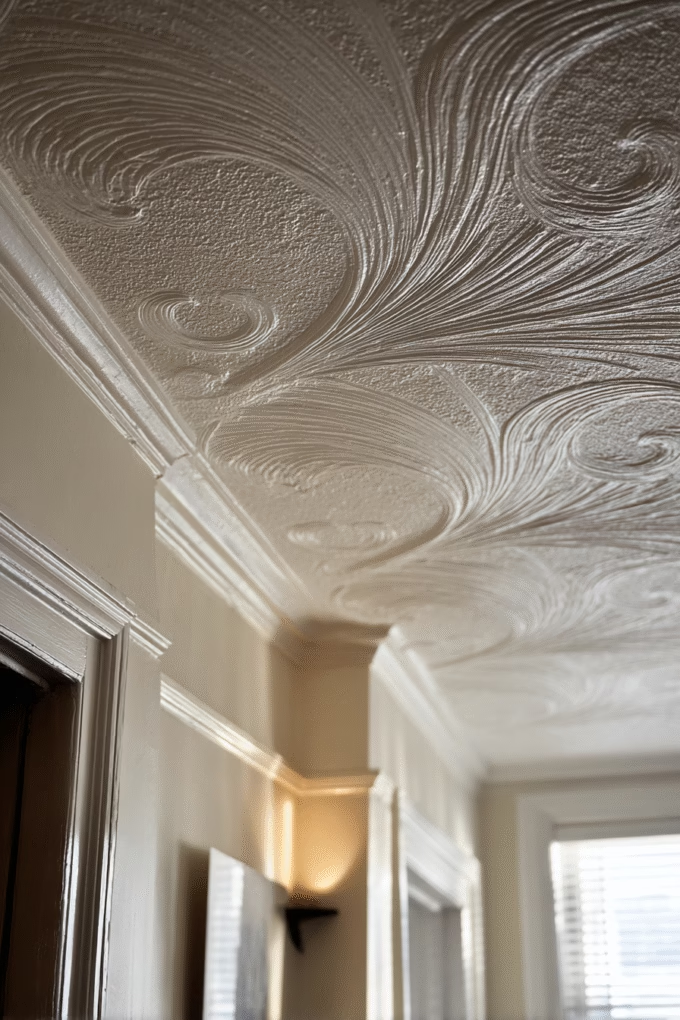
Swirl texture brings artistic elegance to ceilings with its distinctive circular or fan-like patterns. This decorative technique was hugely popular in the 1970s and 1980s, and it’s experiencing a revival among homeowners who appreciate its unique character and handcrafted appeal.
Creating swirl patterns requires skill and the right tools. Contractors apply drywall mud to the ceiling, then use a special brush or trowel to create circular motions in the wet compound. The swirls can be full circles, half-circles, or fan shapes depending on the tool and technique used.
This textured ceiling works best in formal spaces like dining rooms, entryways, or master bedrooms where decorative elements enhance the room’s ambiance. The pattern draws the eye upward, making it a conversation starter and focal point. However, swirl texture can feel overwhelming in small rooms or spaces with heavy pattern work in furnishings.
Interior designers note that swirl texture has psychological benefits beyond aesthetics. The circular, flowing patterns create a calming visual effect that some people find soothing, potentially helping with stress reduction. This makes swirl texture an interesting choice for meditation rooms or bedroom ceilings.
Professional installation ranges from $2 to $4 per square foot due to the time and craftsmanship required. This is definitely not a beginner DIY project—achieving consistent, attractive swirls demands practice and artistic sensibility. Inconsistent patterns look accidental rather than intentional.
The biggest maintenance challenge with swirl texture is cleaning. The deep grooves trap dust and cobwebs more readily than flatter textures, requiring regular attention with a long-handled duster. Repairs are also challenging since matching the swirl pattern perfectly is nearly impossible.
Swirl texture pairs beautifully with vintage-inspired or eclectic design styles. Consider soft, muted colors like pale blue, sage green, or dusty rose to enhance the texture’s elegant character without overwhelming the pattern.
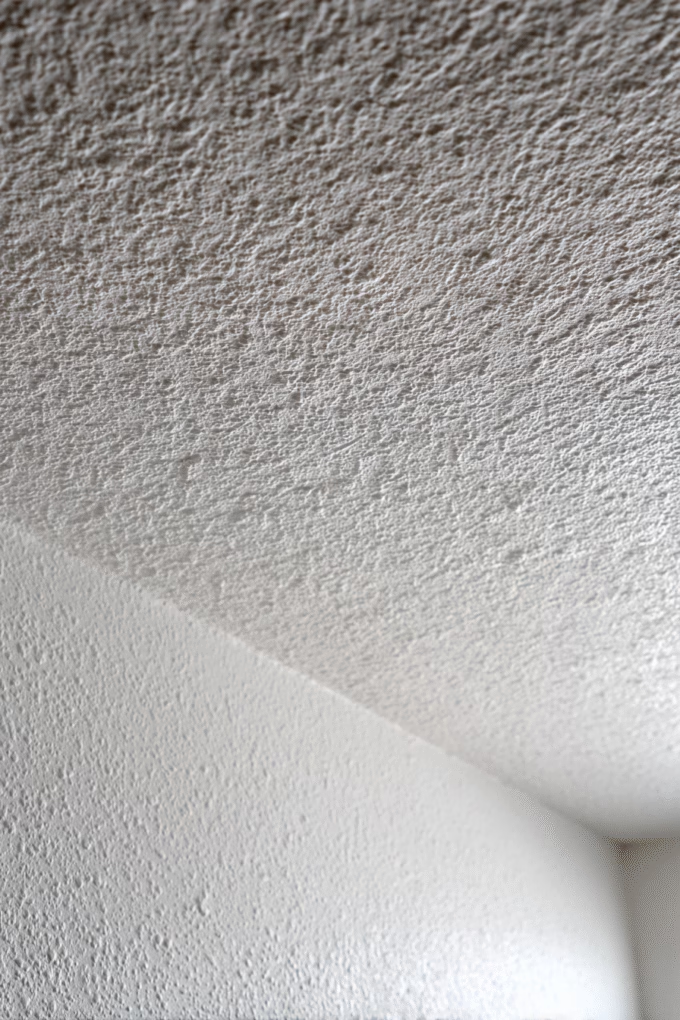
7. Popcorn Ceiling Texture for Acoustic Benefits
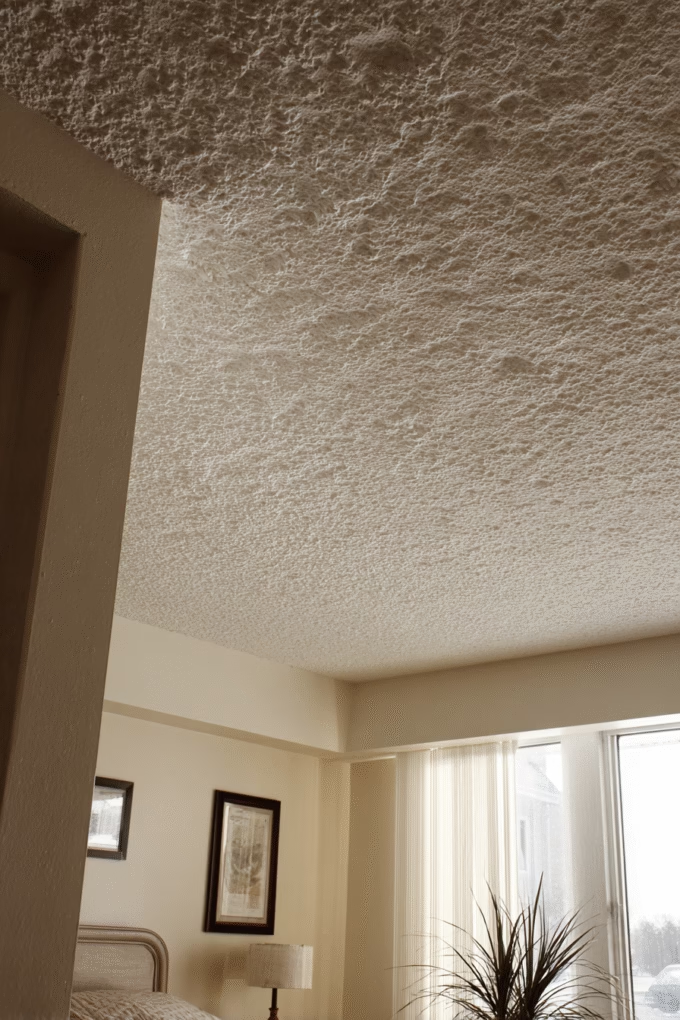
Popcorn ceilings, also called acoustic ceiling texture or cottage cheese ceiling, dominated home construction from the 1950s through the 1980s. While often maligned as dated, this bumpy textured finish offers legitimate functional benefits that explain its enduring presence in many homes.
The distinctive appearance comes from spraying a mixture of drywall compound with vermiculite or polystyrene particles onto the ceiling. The result is a heavily textured surface with small, raised bumps resembling popcorn kernels. This creates substantial depth and dimension that effectively hides ceiling imperfections.
The primary advantage is sound absorption. Popcorn texture’s irregular surface dampens noise and reduces echo, making it particularly valuable in bedrooms, media rooms, and multi-story homes where reducing noise transmission between floors matters. According to acoustic engineering studies, textured ceilings can reduce noise levels by 10-15% compared to smooth finishes.
However, most homeowners and interior designers now view popcorn ceilings as outdated. The heavy texture collects dust and cobwebs, making cleaning challenging. The surface also doesn’t reflect light well, which can make rooms feel darker and smaller—a significant concern in spaces with limited natural light.
If you have popcorn ceilings installed before 1980, critical safety warning: they may contain asbestos. Always have older popcorn texture tested by a certified professional before attempting any removal or renovation. Disturbing asbestos-containing materials without proper precautions poses serious health risks.
Modern alternatives now provide similar acoustic benefits without the dated aesthetic. If you’re considering new construction, opt for other textured ceiling options. If you currently have popcorn ceilings, numerous solutions exist for covering or removing them, including skim coating, installing planking, or professional removal.
Cost for professional popcorn ceiling removal ranges from $1 to $3 per square foot, while covering with alternative materials typically costs $2 to $8 per square foot depending on your chosen solution.
8. Lace Ceiling Texture for Artistic Elegance
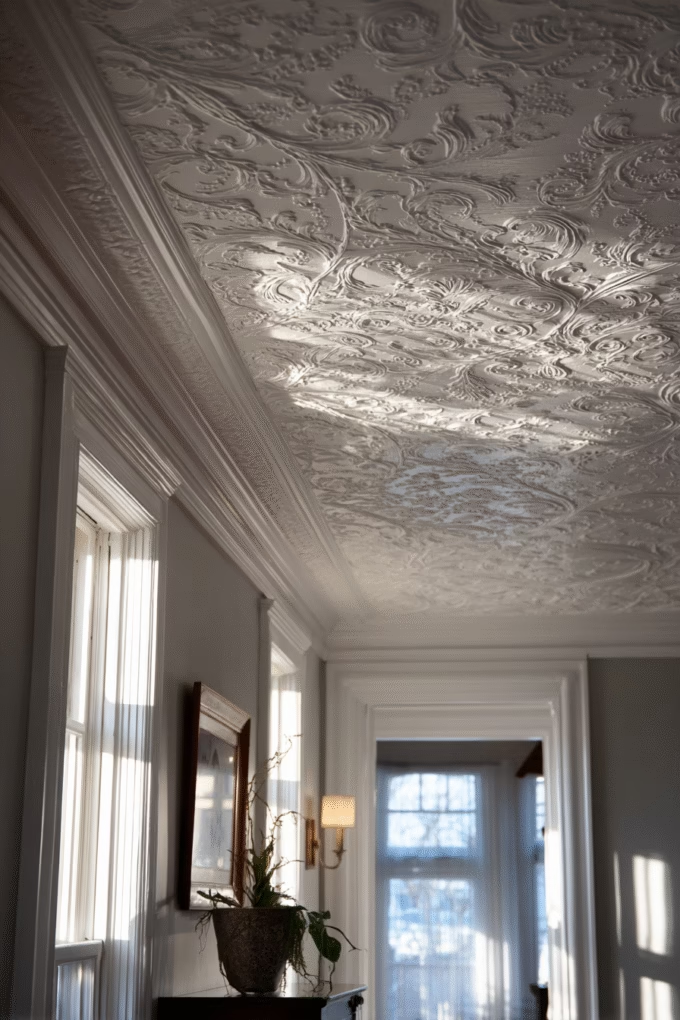
Lace ceiling texture represents the pinnacle of decorative ceiling finishes. This intricate, hand-applied technique creates delicate patterns reminiscent of actual lace fabric, resulting in stunning visual impact that makes ceilings true works of art.
The application process requires exceptional skill and artistry. Contractors apply a base layer of joint compound, then carefully work a second layer using specialized tools to create intricate, lace-like patterns. The possibilities are nearly limitless—from subtle, organic designs to bold geometric patterns—making each lace ceiling truly unique.
This textured finish works best in showpiece rooms where you want maximum visual drama. Living rooms with high ceilings, formal dining areas, and master bedroom suites benefit from lace texture’s elegant sophistication. However, the pattern’s complexity means it should remain the room’s primary decorative element rather than competing with elaborate furnishings or busy wallpaper.
Interior designers recommend lace texture for homeowners who appreciate craftsmanship and aren’t afraid of making bold design choices. The intricate patterns create focal points that draw eyes upward, making rooms feel more spacious while adding undeniable wow-factor that impresses guests.
Professional installation costs $3 to $6 per square foot or higher, reflecting the time, skill, and artistry required. This is absolutely not a DIY project—achieving beautiful lace patterns demands professional-level expertise with drywall finishing techniques. Attempting this without proper training will result in disappointing, unprofessional results.
Maintenance presents challenges since the intricate patterns trap dust in their detailed grooves. Regular cleaning with a soft brush attachment on a vacuum cleaner helps, but plan for this ongoing maintenance requirement before committing to lace texture.
Avoid lace texture in kitchens or bathrooms where humidity and cooking particles would quickly soil the detailed patterns. The texture works best in climate-controlled, low-traffic areas where it can remain pristine for years.
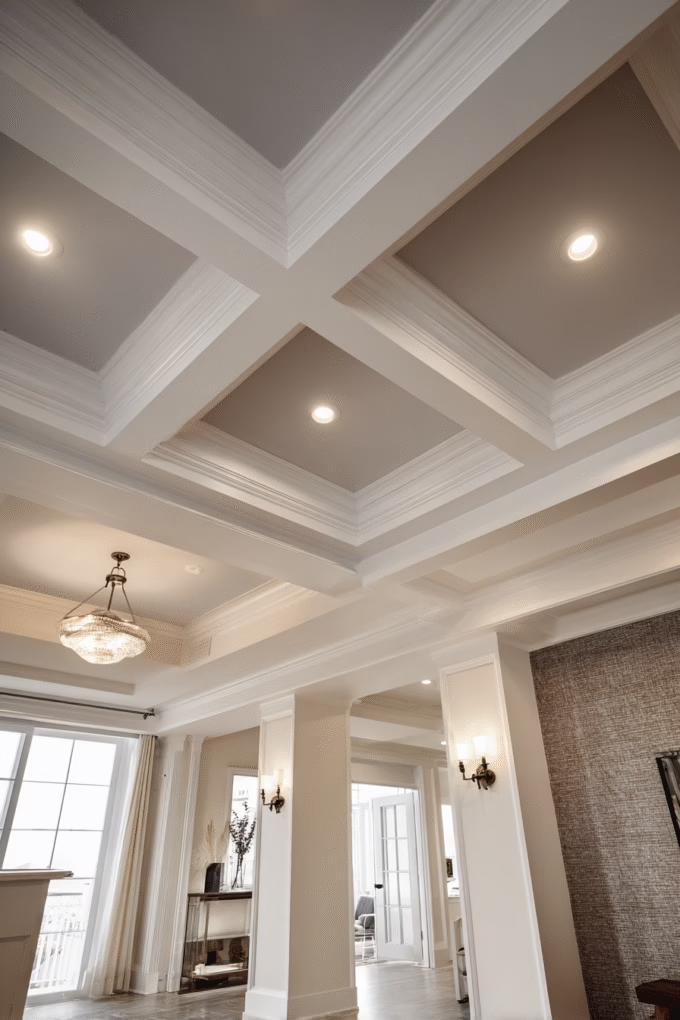
9. Coffered Ceiling for Architectural Drama
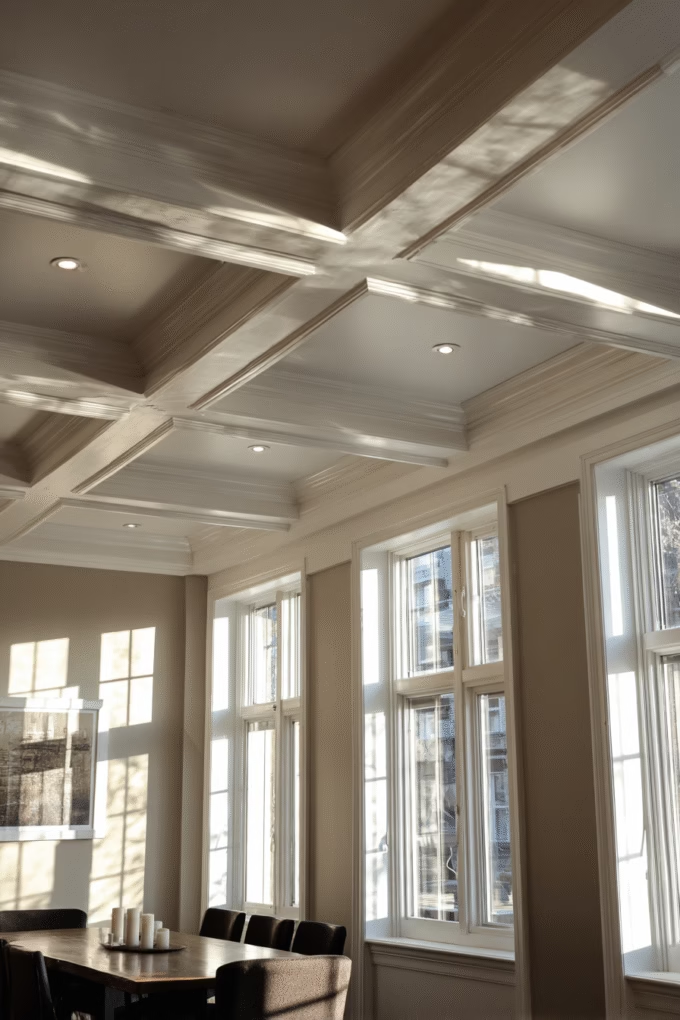
Coffered ceilings represent a significant departure from spray-applied textures, instead creating dimension through architectural elements. This classic design features sunken panels bordered by beams, creating a grid pattern that adds sophisticated depth and visual interest.
Traditional coffered ceilings involve actual construction with wooden beams creating recessed panels. Modern alternatives use lightweight polyurethane or MDF moldings adhered directly to existing ceilings, making the look accessible without major renovation. Both approaches create stunning architectural impact.
This ceiling design particularly suits formal spaces with adequate ceiling height. Dining rooms, libraries, home offices, and great rooms benefit from coffered treatments. The grid pattern works best in square or rectangular rooms where the geometric layout complements the space’s proportions. Avoid coffered designs in rooms under 9 feet tall, as the beam depth can make spaces feel cramped.
Interior designers appreciate how coffered ceilings add perceived value to homes. According to the National Association of Realtors, architectural ceiling details like coffering can increase home value by 3-5%, making this one of the more investment-worthy ceiling upgrades.
The grid pattern provides opportunities for creative paint treatments. Consider painting the recessed panels a different color than the beams—light gray panels with white beams create sophisticated contrast, while painting panels in dramatic colors like navy or charcoal creates bold, contemporary statements.
Professional installation costs vary dramatically from $15 to $30+ per square foot depending on materials and complexity. Simple grid patterns using budget-friendly materials fall on the lower end, while custom designs with premium hardwoods command higher prices. DIY installation of lightweight beam systems is possible for handy homeowners, potentially reducing costs to $3 to $10 per square foot for materials.
Maintenance is minimal since the structured design doesn’t trap dust like textured surfaces. Simple dusting of horizontal beam surfaces keeps coffered ceilings looking pristine for years.
10. Wood Plank Ceiling for Rustic Warmth
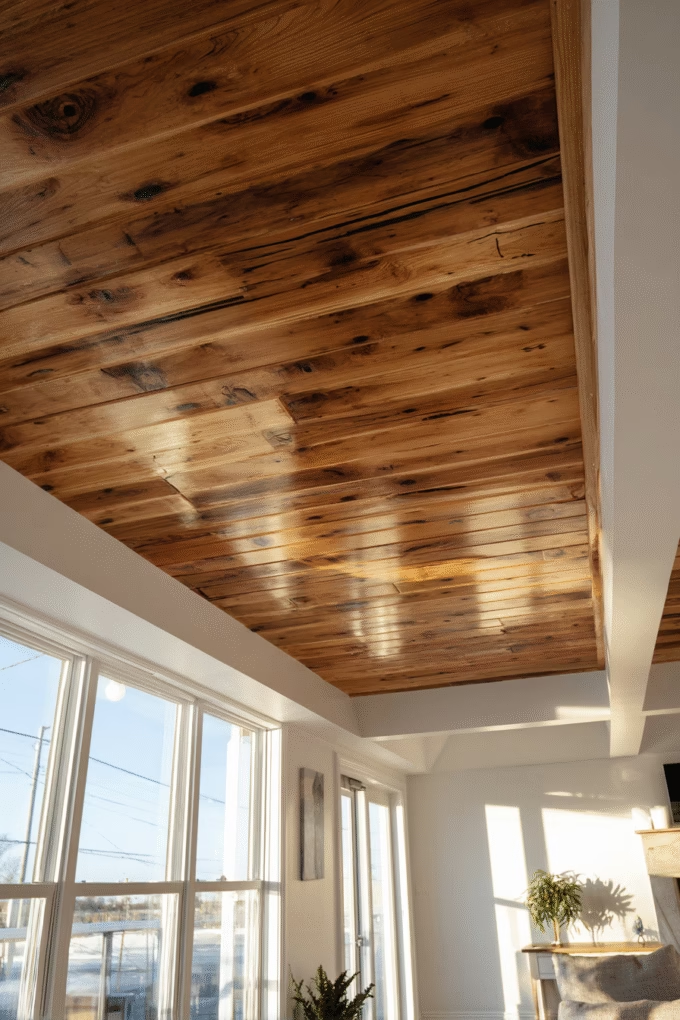
Wood plank ceilings bring natural texture, warmth, and organic beauty to interiors. This increasingly popular treatment involves installing horizontal wood planks across the ceiling, creating a ceiling design that ranges from casual farmhouse to refined contemporary depending on wood choice and finish.
Multiple wood options work beautifully on ceilings. Shiplap creates clean lines with subtle shadow gaps between boards, perfect for modern farmhouse aesthetics. Tongue-and-groove planking provides seamless coverage for more traditional looks. Reclaimed barn wood adds authentic rustic character, while smooth cedar planks work well in contemporary settings.
This ceiling treatment particularly shines in great rooms, covered porches, and kitchens where you want to introduce natural materials. The horizontal lines create visual width, making rooms feel more expansive. Wood ceilings also pair beautifully with exposed beams for cohesive architectural interest throughout the space.
Interior designers love how wood ceilings add warmth without requiring floor or wall coverage. This allows more flexibility with other design elements since the ceiling provides sufficient natural texture. The organic material also improves acoustics by absorbing sound, creating more intimate, comfortable spaces.
Cost varies significantly based on wood selection and installation complexity. Basic pine shiplap runs $2 to $5 per square foot installed, while premium woods like cedar, cypress, or reclaimed barnwood cost $6 to $12 per square foot or higher. DIY installation is definitely possible for homeowners comfortable with basic carpentry.
Wood requires more maintenance than drywall ceilings. Natural wood needs periodic inspection for moisture damage, especially in bathrooms or kitchens. Most installations benefit from protective clear sealant to prevent discoloration and simplify cleaning. Dust accumulates in plank grooves, requiring regular attention with a microfiber duster.
Consider wood species carefully based on your climate. Cedar and cypress naturally resist moisture, making them smart choices for humid regions. Pine works well in dry climates but may warp in areas with high humidity fluctuations.
11. Beadboard Ceiling for Cottage Charm
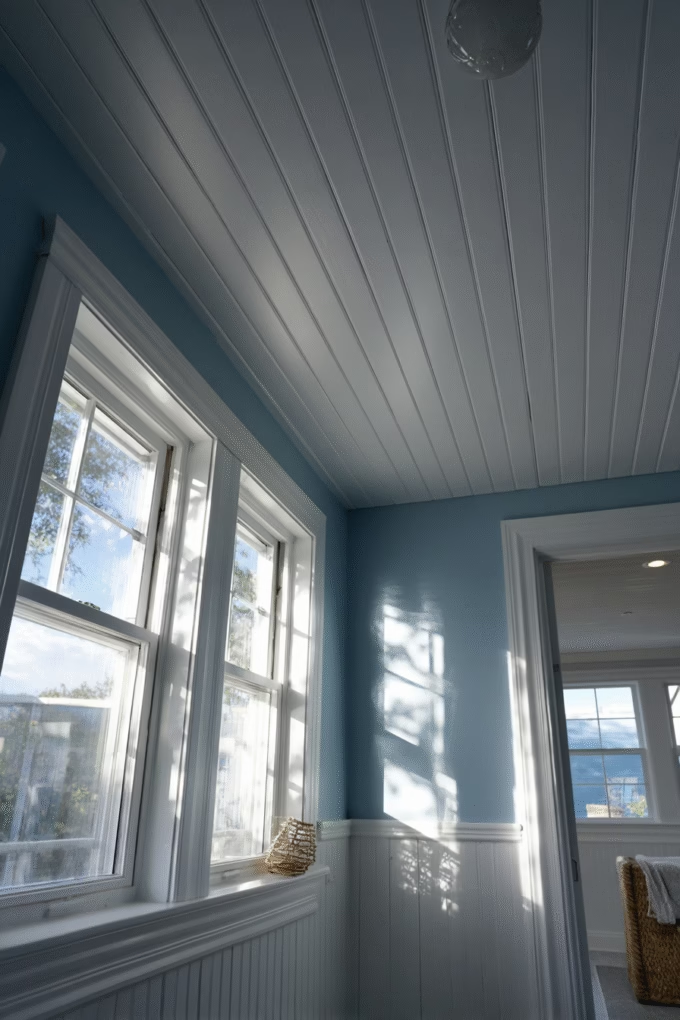
Beadboard ceiling panels bring classic cottage and coastal style to any room. This traditional wall treatment translates beautifully to ceilings, creating subtle vertical texture through narrow grooves that run the length of each board.
True beadboard consists of individual narrow planks with decorative beading along edges. Modern versions use 4×8-foot panels with beaded grooves milled into the surface, significantly simplifying installation. Both create the same charming visual effect with vertical lines that draw eyes upward.
This textured ceiling treatment works exceptionally well in bedrooms, bathrooms, mudrooms, and covered porches. The vertical lines create perceived height, making rooms with standard 8-foot ceilings feel taller. The style particularly complements coastal, cottage, farmhouse, and traditional design aesthetics.
Interior designers appreciate beadboard’s versatility with paint colors. Classic white creates crisp, clean coastal vibes perfect for beach houses. Soft pastels like pale blue, mint green, or blush pink add personality to children’s rooms or bathrooms. For dramatic effect, try navy or charcoal gray in formal spaces.
Cost-wise, beadboard proves quite budget-friendly. Pre-primed 4×8 panels cost $15 to $30 each at home improvement stores, translating to approximately $2 to $3 per square foot installed. DIY installation is very manageable for homeowners with basic carpentry skills—the panels attach directly to ceiling joists with finishing nails or construction adhesive.
One practical advantage is beadboard’s ability to cover popcorn ceilings without messy removal. The panels install right over existing texture, providing an affordable update that completely transforms the space. This makes beadboard especially popular for rental properties and budget-conscious renovations.
Maintenance involves regular dusting of the vertical grooves where dust accumulates. The painted surface wipes clean easily, making beadboard more practical than heavily textured alternatives. Occasional repainting keeps the ceiling looking fresh for decades.
12. Tin Ceiling Tiles for Vintage Character
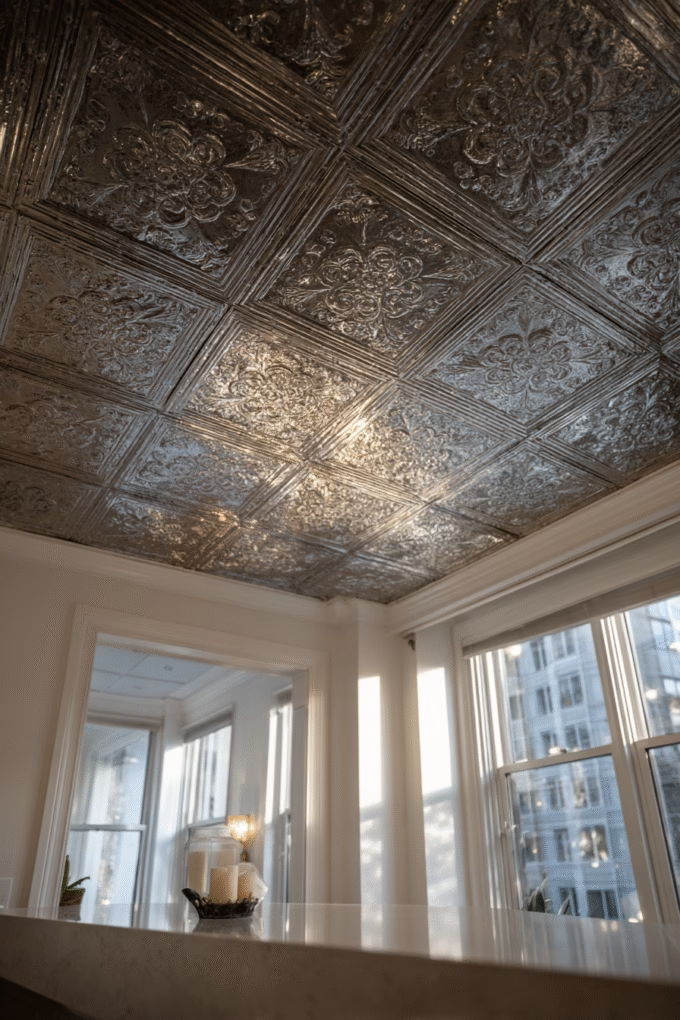
Pressed tin ceiling tiles bring vintage architectural character and glamorous shine to interiors. Originally popular in late 19th and early 20th century homes, these embossed metal tiles are experiencing renewed popularity as homeowners seek distinctive alternatives to standard drywall finishes.
Authentic tin tiles feature intricate embossed patterns—florals, geometrics, or Art Deco designs—pressed into thin metal sheets. Modern reproductions use lightweight aluminum or PVC for easier installation and lower cost while maintaining traditional aesthetic appeal. Both options create stunning three-dimensional patterns that catch and reflect light beautifully.
This ceiling treatment works spectacularly in kitchens, dining rooms, and commercial spaces like restaurants or boutiques. The reflective surface brightens spaces by bouncing light, making rooms feel larger and more vibrant. The vintage character adds instant personality and sophisticated style.
Interior designers love tin ceilings for their versatility with finish options. Leave metallic finishes natural for industrial or eclectic styles. Paint tiles in bold colors like matte black or jewel tones for dramatic contemporary statements. Distressed or antiqued finishes create authentic vintage appeal perfect for historic home renovations.
Cost varies dramatically between authentic tin and modern alternatives. Real stamped tin runs $8 to $15 per square foot installed, while lightweight faux tin PVC tiles cost $2 to $6 per square foot. Both require professional installation for best results, though confident DIYers can tackle PVC tile installation with proper planning.
One practical advantage is tin ceilings’ ability to cover popcorn ceilings without removal. The tiles install on furring strips or directly over existing ceilings, providing dramatic transformation with minimal demolition. This makes tin tiles popular for updating older homes while preserving architectural integrity.
Maintenance is straightforward—wipe tiles with damp cloth to remove dust and maintain shine. The durable metal surface resists damage and maintains beauty for decades with minimal care.
13. Tray Ceiling with Textured Accents
Tray ceilings, also called recessed ceilings, create architectural interest through multi-level design. The center portion of the ceiling sits higher than the perimeter, resembling an inverted tray. Adding texture to the recessed center panel elevates this design from subtle to stunning.
The technique involves standard construction for the tray structure—typically a 4 to 12-inch drop around the room’s perimeter with the center section remaining at full ceiling height. The elevated center panel then receives textured treatment—anything from subtle knockdown to decorative skip trowel or even wallpaper—while perimeter sections remain smooth.
This ceiling design particularly suits master bedrooms, formal dining rooms, and living rooms where you want to define space and add elegance. The recessed center draws eyes upward and creates focal points, especially when combined with statement lighting like chandeliers or modern pendant fixtures.
Interior designers recommend emphasizing tray ceilings through strategic paint color choices. Paint the recessed center panel in contrasting colors—soft gray center with white perimeter creates sophisticated depth, while bold navy or charcoal center panels make dramatic contemporary statements.
The textured accent adds an extra dimension beyond basic tray construction. Consider subtle orange peel texture for understated elegance, or opt for more dramatic textures like skip trowel or metallic finishes for maximum visual impact. The key is choosing texture that complements rather than competes with the room’s other design elements.
Professional tray ceiling construction with textured accent costs $4 to $10 per square foot depending on complexity and texture choice. Basic tray installation is within reach of advanced DIYers, though adding texture requires drywall finishing skills.
Maintenance depends on your texture choice. Smooth perimeter sections wipe clean easily, while textured center panels require the same care as any textured ceiling. The multi-level design creates horizontal surfaces that collect dust, so plan for regular cleaning with microfiber dusters.
14. Venetian Plaster for Luxe Sophistication
Venetian plaster brings Old World elegance and polished sophistication to ceiling surfaces. This ancient finishing technique creates smooth, marble-like texture through multiple thin layers of lime plaster applied with specialized trowels and burnished to subtle sheen.
The application process requires true artistry. Skilled artisans apply 4-6 ultra-thin layers of tinted plaster, each layer slightly different in hue. Between applications, surfaces are burnished with steel trowels to create the characteristic soft sheen and subtle color variation that mimics natural stone. The result is luminous, depth-filled surface unlike any other ceiling treatment.
This luxurious finish works beautifully in formal spaces where you want maximum sophistication—master bedrooms, dining rooms, powder rooms, and living rooms in upscale homes. Venetian plaster ceilings become art pieces that elevate entire rooms, creating ambiance that photographs beautifully and impresses guests.
Interior designers particularly appreciate Venetian plaster’s versatility with color. Neutral tones like cream, sand, and soft gray create serene elegance. Metallic additions produce subtle shimmer perfect for glamorous spaces. Rich colors like deep blue or warm terracotta create dramatic statements in contemporary or Mediterranean-inspired interiors.
The technique offers practical benefits beyond aesthetics. Venetian plaster is naturally moisture-resistant, antimicrobial, and durable—lasting decades without fading or deteriorating. The smooth surface resists dust accumulation and wipes clean effortlessly, making maintenance minimal despite the premium price point.
Speaking of cost, Venetian plaster represents significant investment. Professional application ranges from $8 to $20+ per square foot depending on complexity, color layering, and artisan skill level. This is absolutely not DIY-friendly—achieving beautiful results requires specialized training and years of practice.
For homeowners seeking the look at lower cost, faux Venetian plaster products exist. While these don’t match authentic plaster’s depth and durability, they provide similar aesthetic at $3 to $8 per square foot installed.
15. Exposed Beam Ceiling with Textured Background
Exposed beams create dramatic architectural interest while adding perceived height and rustic character. Combining structural beams with textured ceiling backgrounds between them creates layered dimension that’s trending strongly in 2025 design.
The approach involves either exposing existing structural beams or adding faux beams (hollow lightweight wood boxes) to the ceiling surface. The areas between beams then receive textured treatment—subtle knockdown or orange peel works beautifully for modern farmhouse looks, while skip trowel or Venetian plaster creates more refined elegance.
This ceiling design particularly suits great rooms, kitchens with high ceilings, and vaulted living spaces where the added dimension enhances spatial drama. The beams provide structural visual framework while textured panels add warmth and character. The combination creates sophisticated layers that feel custom and high-end.
Interior designers recommend strategic beam placement following architectural principles. Beams running perpendicular to the room’s longest dimension make spaces feel wider. Regularly spaced beams (typically 3 to 5 feet apart) create formal, organized aesthetics, while irregular spacing produces more casual, organic appeal.
Wood species and finish dramatically impact overall style. Natural wood beams with visible grain add warmth and rustic character. Painted beams in white or soft gray create modern farmhouse sophistication. Dark-stained beams against lighter textured backgrounds produce dramatic contrast perfect for contemporary spaces.
Professional installation of faux beams with textured backgrounds costs $6 to $15 per square foot depending on materials and texture complexity. True structural beam exposure involves significant construction costs. DIY faux beam installation is possible for handy homeowners, with beams available at home improvement stores starting around $50 per 8-foot section.
Maintenance involves dusting the horizontal beam surfaces regularly while caring for textured areas according to their specific finish. The layered design creates visual interest that doesn’t require constant upkeep.
16. Grasscloth Wallpaper Ceiling for Natural Texture
Grasscloth wallpaper brings organic, natural texture to ceilings through woven plant fibers. This eco-friendly material creates subtle dimensional interest through its handcrafted, slightly irregular weave, offering textured aesthetic without heavy application processes.
True grasscloth consists of natural grasses, hemp, or jute fibers woven and adhered to paper backing. The organic materials create unique texture variations from roll to roll, making each installation truly one-of-a-kind. Modern versions offer similar aesthetics with more uniform patterns and easier maintenance.
This ceiling treatment particularly suits bedrooms, home offices, and sitting rooms where you want to introduce natural elements and calming aesthetics. The organic texture brings warmth and sophisticated simplicity, complementing minimalist, coastal, or organic modern design styles beautifully.
Interior designers appreciate grasscloth’s ability to add texture without overwhelming small spaces. Unlike heavy textured compounds, grasscloth provides visual interest while maintaining relatively flat profile. This makes it perfect for rooms with 8-foot ceilings where dimensional textures might feel too heavy.
Color options range widely from natural neutral tones (beiges, taupes, warm whites) to dyed versions in soft blues, greens, or even metallic finishes. Neutral tones create serene, spa-like atmospheres, while colored grasscloth makes subtle design statements without dominating spaces.
Professional wallpaper installation on ceilings costs $3 to $8 per square foot including materials. Ceiling application is more challenging than walls, requiring experience to handle heavy, paste-laden wallpaper above your head without creating bubbles or misalignment. This isn’t recommended for DIY beginners.
Maintenance requires gentle care since natural fibers can’t withstand moisture. Light dusting keeps grasscloth looking fresh. Avoid installation in bathrooms or kitchens where humidity could damage the natural materials. Some versions offer protective coatings that improve durability without sacrificing natural appearance.
17. 3D Wall Panels for Bold Contemporary Texture
Three-dimensional wall panels represent modern innovation in textured ceiling design. These prefabricated panels feature geometric patterns, waves, or organic shapes that create dramatic shadow play and contemporary sophistication when installed on ceilings.
The panels come in various materials—lightweight PVC, eco-friendly bamboo fiber, gypsum, or premium wood—each offering different aesthetics and price points. Patterns range from subtle linear waves to bold geometric designs, with options suitable for every design style from minimalist to maximalist.
This ceiling treatment works spectacularly in modern spaces where you want architectural drama—home offices, media rooms, contemporary dining areas, and statement-making entryways. The three-dimensional patterns create focal points that change appearance throughout the day as natural light shifts, providing dynamic visual interest.
Interior designers particularly appreciate how 3D panels add texture without traditional messy application processes. The panels install directly over existing drywall using adhesive, eliminating the need for texture spraying, drying time, and potential mistakes. This makes achieving professional results much more accessible.
The geometric patterns also provide acoustic benefits by diffusing sound waves, similar to professional acoustic paneling. This makes 3D ceiling panels practical for home theaters, music rooms, or open-concept spaces where noise control matters.
Cost varies by material and pattern complexity. Basic PVC panels run $3 to $8 per square foot, while premium materials like bamboo or wood cost $8 to $20 per square foot. Installation is moderately DIY-friendly—the panels are lightweight and cut with standard tools, though achieving perfect alignment requires patience and precision.
Maintenance is minimal since the panels’ durability resists damage. Simple dusting keeps the three-dimensional patterns looking crisp. Most panels accept paint, allowing you to customize colors to match evolving design preferences.
18. Painted Faux Finish for Artistic Texture
Faux finishing techniques bring artistic dimension to ceilings through specialized painting methods that create texture-like appearance without actual raised surfaces. Techniques like color washing, rag rolling, or sponging add subtle depth and character through layered paint applications.
The process involves applying base coat, then using specialized tools (sponges, rags, brushes) to apply second and sometimes third colors in patterns that create dimensional illusion. The result appears textured from below but remains relatively smooth, making it easier to clean than actual textured surfaces.
This ceiling treatment particularly suits homeowners who want textured aesthetic without commitment to permanent raised finishes. The technique works beautifully in bedrooms, dining rooms, and living areas where you want subtle sophistication. Faux finishes complement transitional, traditional, and eclectic design styles.
Interior designers appreciate faux finishing’s versatility for creating custom looks. Color washing with soft neutrals creates dreamy, romantic atmospheres. Metallic glazes add glamorous shimmer perfect for formal spaces. Faux techniques can even mimic more expensive finishes like Venetian plaster at fraction of the cost.
The major advantage over traditional textures is reversibility. If you tire of the look or design trends shift, simply repaint with solid color. This flexibility makes faux finishing appealing for homeowners who enjoy updating their interiors periodically without major renovation.
Professional faux finishing costs $2 to $6 per square foot depending on technique complexity and number of color layers. Experienced DIYers can attempt basic techniques after practicing on sample boards, though achieving consistent, professional results on large ceiling surfaces requires steady hands and good color sense.
Maintenance is straightforward since the relatively smooth surface dusts easily. Occasional repainting refreshes the finish, typically needed every 5-10 years depending on room use and quality of original application.
19. Spray Sand Texture for Fine, Gritty Dimension
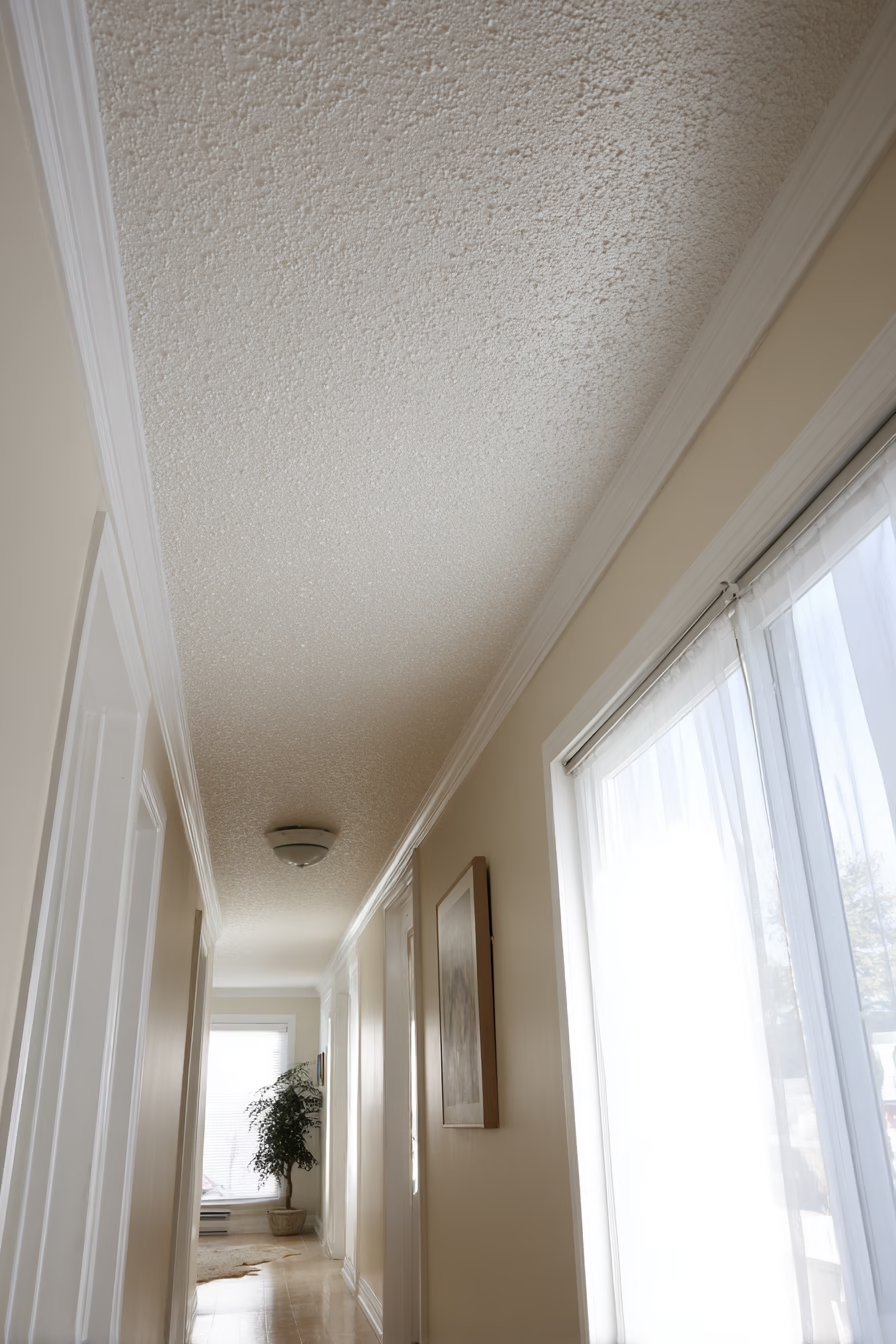
Spray sand texture creates a finely textured surface that falls somewhere between orange peel and completely smooth finishes. This technique involves spraying a mixture of fine sand particles mixed with drywall compound onto the ceiling, resulting in a subtle, gritty appearance that adds just enough dimension without overwhelming the space.
The application process is straightforward, making spray sand one of the most DIY-friendly textured ceiling options. Using a hopper gun or specialized spray texture gun, the sand-and-compound mixture is applied in even passes across the ceiling. The result is thousands of tiny bumps that create a refined, almost sparkly appearance when light hits the surface.
Interior designers recommend spray sand texture for modern homes seeking subtle sophistication. The fine texture works exceptionally well in entryways, hallways, and bedrooms where you want slight visual interest without dramatic pattern work. The texture is refined enough to complement minimalist aesthetics while still providing practical benefits like hiding minor imperfections.
Cost-wise, spray sand is extremely budget-friendly at $1 to $2.50 per square foot for professional installation. DIY application is very manageable with rented equipment from home improvement stores—practice on cardboard first to get the spray distance and pattern right before tackling your ceiling.
One major advantage is the texture’s ability to hide ceiling imperfections while remaining relatively easy to clean compared to heavier textures. The fine, uniform pattern doesn’t trap as much dust as popcorn or swirl textures, though it does require slightly more maintenance than perfectly smooth finishes.
The subtle texture pairs beautifully with contemporary and transitional design styles. Consider painting spray sand ceilings in soft whites, light grays, or even subtle pastels to create dreamy, dimensional effects. In rooms with good natural light, the fine texture creates gentle sparkle that adds warmth without drawing excessive attention upward.
Repairs are reasonably straightforward since matching spray sand texture doesn’t require the artistic skill needed for hand-applied patterns like swirl or lace. Touch-up spray cans are available at most paint stores for minor damage repair.
Imagine This: IMG_9856.HEIC: Taken with a Canon camera, f/3.5 aperture, ISO 200, 1/160 shutter speed, bright natural light from windows illuminating the ceiling. A hallway ceiling showcases spray sand texture in soft white, with thousands of fine bumps creating subtle gritty dimension across the surface. The texture is delicate enough to appear almost smooth from a distance, but up close reveals tiny uniform peaks that catch light like fine glitter. Light beige walls complement the textured ceiling, with natural afternoon light demonstrating how the fine texture adds refined sophistication without overwhelming the narrow space. The subtle pattern creates gentle visual interest perfect for contemporary homes seeking understated elegance.
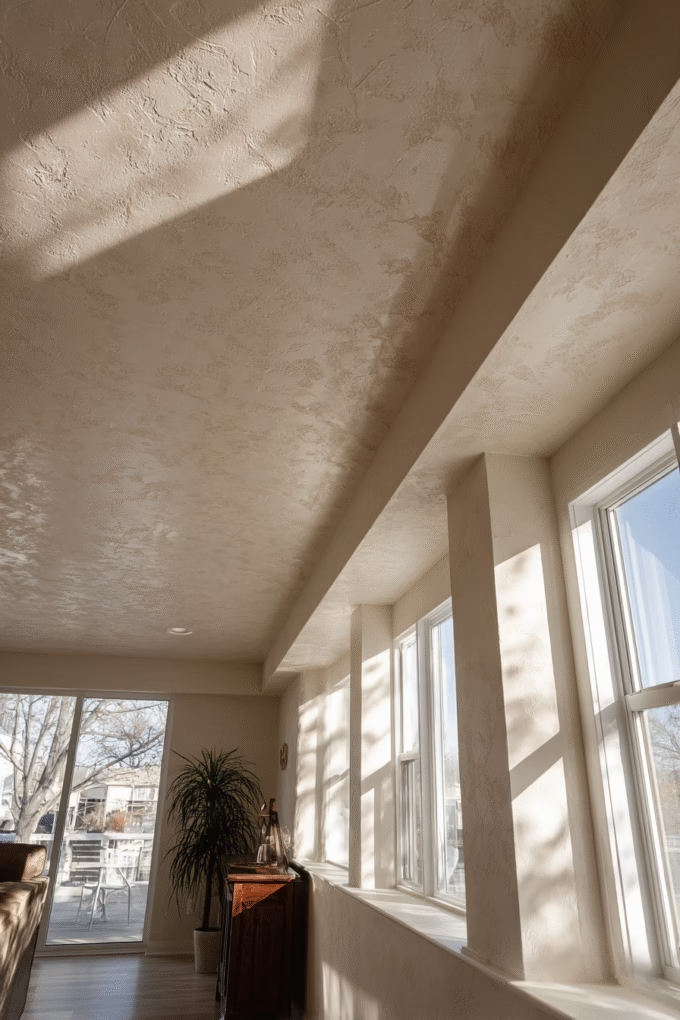
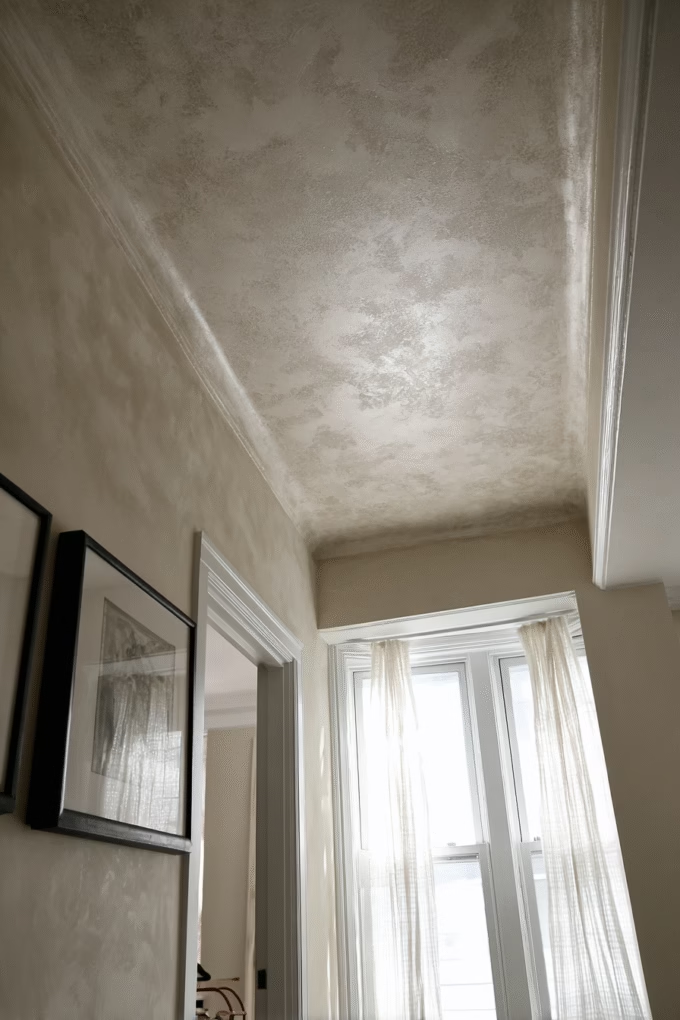
20. Limewash or Textured Paint for Organic Depth
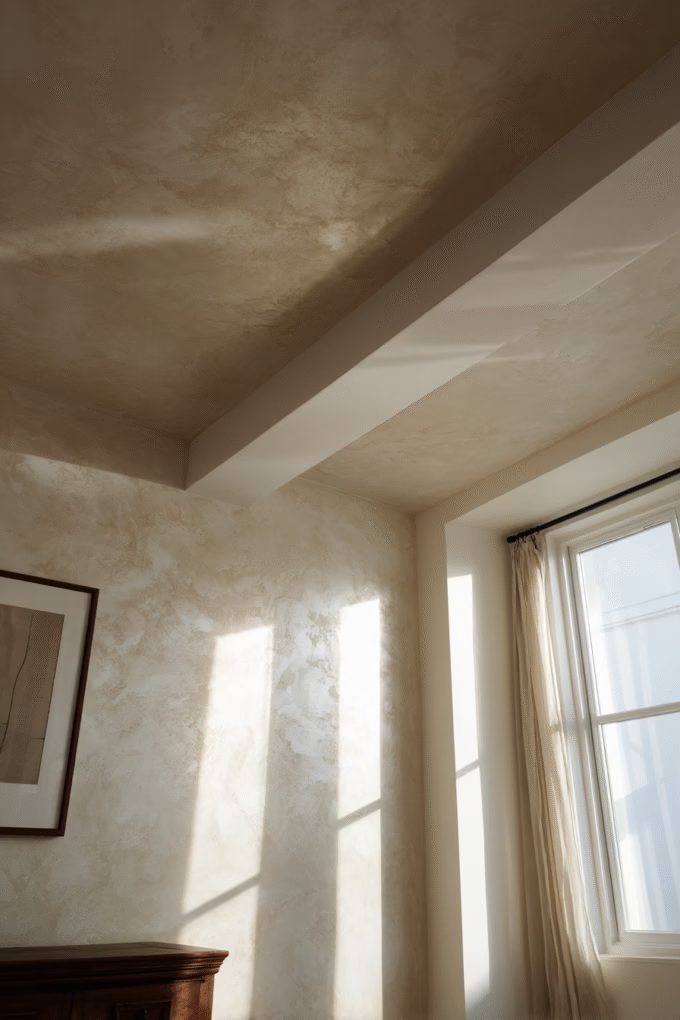
Limewash and textured paint techniques represent the cutting edge of 2025 ceiling trends, bringing old-world European sophistication into modern interiors. These application methods create subtle, organic texture through paint itself rather than joint compound, resulting in surfaces with authentic patina and dimensional character.
Limewash is a centuries-old technique using lime-based paint that dries with naturally varied, matte finish. Modern versions like Roman clay or specialty textured paints achieve similar effects with easier application. The technique involves applying paint with brushes, trowels, or specialty tools in overlapping strokes that create subtle variations in color depth and surface texture.
This ceiling treatment is perfect for homeowners seeking European-inspired sophistication or organic modern aesthetics. The naturally imperfect finish brings warmth and character that feels both timeless and very current—exactly what interior designers are embracing in 2025. Bedrooms, living rooms, and dining areas all benefit from limewash’s soft, enveloping atmosphere.
According to a 2021 interior design trend report, old-school techniques like limewash and Roman clay are experiencing renewed popularity for their ability to add subtle variance and authentic texture without feeling trendy or dated.
The application creates depth through multiple thin layers, each slightly different in tone. This dimensional quality makes spaces feel more expensive and custom than standard flat paint could achieve. The matte finish also absorbs light beautifully, reducing glare while adding warmth.
Professional limewash application costs $4 to $8 per square foot, while DIY-friendly textured paint products run $2 to $4 per square foot in materials. The technique is moderately DIY-accessible—achieving beautiful results requires patience and willingness to embrace organic imperfection rather than pursuing perfect uniformity.
Color options range from classic whites and creams to rich terracotta, soft blue-grays, and warm sage greens. The layered application technique means colors appear richer and more complex than standard paint, with subtle variations that change throughout the day as natural light shifts.
Maintenance is refreshingly simple. The durable finish resists moisture and doesn’t show dust accumulation like heavily textured surfaces. Touch-ups blend seamlessly since the naturally varied finish camouflages small repairs. Many limewash formulations are also antimicrobial and environmentally friendly, appealing to eco-conscious homeowners.
Imagine This: IMG_9856.HEIC: Taken with a Canon camera, f/4.0 aperture, ISO 250, 1/125 shutter speed, soft natural light from nearby windows creating gentle illumination. A living room ceiling features limewash technique in warm cream tones, with subtle variations in color depth and gentle texture creating organic dimensional quality across the surface. The matte finish shows authentic patina with naturally imperfect coverage that appears intentionally artisanal rather than flawed. Soft white walls complement the textured ceiling, with natural light revealing how the layered paint application creates depth and warmth through subtle color variations. The European-inspired finish adds sophisticated character perfect for spaces seeking timeless elegance with contemporary appeal.
Choosing the Right Textured Ceiling for Your Space
Selecting the perfect textured ceiling involves balancing aesthetics, budget, maintenance requirements, and your home’s architectural style. Consider these key factors when making your decision:
Room Size and Ceiling Height: Small rooms and spaces under 8 feet benefit from subtle textures like orange peel or smooth finishes that don’t overwhelm. Larger areas with 9+ foot ceilings can handle dramatic options like coffered designs, exposed beams, or bold 3D panels.
Natural Light Availability: Rooms flooded with natural light showcase textured finishes beautifully through shadow play. Spaces with limited windows may perform better with smoother, more reflective surfaces that maximize available light.
Maintenance Commitment: Heavily textured options like popcorn, swirl, or lace require regular dusting and more challenging cleaning. If you prioritize low-maintenance living, opt for smooth finishes, painted faux techniques, or beadboard that wipes clean easily.
Budget Considerations: Basic spray textures like orange peel and knockdown ($1-3 per square foot) provide affordable updates. Mid-range options include wood planking and beadboard ($2-5 per square foot). Premium choices like Venetian plaster, authentic tin tiles, and coffered ceilings ($8-20+ per square foot) represent significant investments.
Design Style Compatibility: Match your textured ceiling to your home’s overall aesthetic. Modern spaces benefit from smooth finishes or geometric 3D panels. Traditional homes suit coffered ceilings or decorative textures like lace. Farmhouse interiors pair perfectly with wood planks or beadboard.
Resale Value Impact: According to the National Association of Realtors, homes with updated ceilings—particularly smooth finishes or attractive architectural details—sell faster and for higher prices. Avoid dated options like heavy popcorn texture if selling within five years.
DIY vs. Professional Installation: Assess your skill level honestly. Basic options like beadboard installation or spray texture application are DIY-friendly with proper preparation. Complex techniques like Venetian plaster, lace texture, or coffered construction require professional expertise.
The right textured ceiling elevates your entire space, creating dimension and character that transforms ordinary rooms into distinctive, personalized environments. Take time to research, view samples, and consult with professionals to ensure your investment delivers the beautiful, functional ceiling you envision.
Frequently Asked Questions About Textured Ceilings
What is the most popular ceiling texture right now?
Knockdown texture and smooth finishes currently dominate new construction and renovations. Knockdown provides subtle visual interest while hiding imperfections, making it a popular choice for budget-conscious homeowners. Smooth ceilings appeal to buyers seeking modern, minimalist aesthetics and maximum light reflection.
Which ceiling texture is best for resale value?
Smooth finishes consistently rank highest for resale value. According to real estate data, potential buyers perceive smooth ceilings as modern, well-maintained, and move-in ready. If smooth installation isn’t in your budget, knockdown texture is the next best option since it appears in many newer homes and doesn’t look dated.
Can I apply texture over popcorn ceiling?
Some textures can be applied over popcorn ceilings, but results vary. Lightweight options like additional spray texture or skim coating work if the existing popcorn is well-adhered. However, most designers recommend covering popcorn with alternative materials like planking, beadboard, or panels rather than layering more texture. Always test for asbestos before disturbing ceilings installed before 1980.
Are textured ceilings outdated?
It depends on the specific texture type. Heavy popcorn ceiling texture is considered outdated and can decrease home value. However, subtle textures like orange peel, knockdown, and modern options like 3D panels or wood planking are currently trending. The key is choosing contemporary textures rather than those associated with 1970s-1980s design.
What’s the easiest ceiling texture for DIY application?
Orange peel texture is the most beginner-friendly option. Spray-on versions come in aerosol cans requiring no special equipment—just shake and spray. Stipple (slap brush) texture is also relatively DIY-friendly with practice. Avoid attempting lace texture, swirl patterns, or Venetian plaster without professional training.
Do textured ceilings help with sound absorption?
Yes, textured ceilings provide better acoustic benefits than smooth surfaces. Popcorn texture offers the most significant sound absorption, reducing echo and noise transmission by 10-15%. Other textured options like knockdown, stipple, and 3D panels also improve acoustics, though less dramatically than popcorn.
How much does it cost to texture a ceiling?
Costs vary significantly by texture type. Basic spray textures (orange peel, knockdown) cost $1-3 per square foot professionally installed. Mid-range options (skip trowel, wood planking) run $2-8 per square foot. Premium finishes (Venetian plaster, coffered ceilings, authentic tin) cost $8-20+ per square foot. DIY projects can reduce costs by 50-70% for beginner-friendly textures.
Can textured ceilings be painted?
Yes, all textured ceilings accept paint. Use flat or matte finish paint for textured surfaces to minimize glare and highlight dimensional patterns. Spray application works best for heavily textured options like popcorn, while roller application suits flatter textures. Expect to use 20-30% more paint on textured surfaces compared to smooth ceilings due to increased surface area.
What ceiling texture works best for small rooms?
Subtle textures like orange peel or light knockdown work best in small spaces. These provide visual interest without overwhelming compact areas or making low ceilings feel lower. Avoid heavy textures like swirl or lace in small rooms—they can make spaces feel cramped and claustrophobic. Smooth ceilings in bright white also work well to maximize light and spaciousness.
How do I choose between different texture types?
Consider four key factors: your home’s architectural style, maintenance commitment, budget, and ceiling height. Match texture to your design aesthetic—modern homes suit smooth or geometric options while traditional spaces benefit from decorative textures. Factor in cleaning requirements and professional vs. DIY installation costs. Finally, ensure your ceiling height can accommodate the texture depth without making rooms feel smaller.